
Lesson Lab
Eight shapes. That is the entire beginner guitar vocabulary, and it covers a startling number of songs you already know by heart. None of them need a barre — the move where one finger lies flat across several strings at once — none reach past the third fret, and the most demanding one asks for three fingers.
The problem with most chord charts is that they hand you forty shapes at once and leave you to work out which ones matter. This one gives you the eight that do, in the order worth learning them, plus the changes to drill and the songs those changes unlock. First, though, the diagrams themselves — that part takes about a minute.
👩🏫🎸 A teacher hears a muted string the moment you play it, and you might not notice it for months. Get MOOZ and take your first guitar lesson →.
How to read a guitar chord chart
A chord diagram is your guitar neck stood on end, seen head-on, as if the instrument were hanging on the wall in front of you. The six vertical lines are the six strings, thickest on the left. The horizontal lines are frets. The thick bar across the top is the nut, the strip of bone or plastic where the fretboard ends and the headstock begins.
A dot means press that string at that fret. The number inside the dot tells you which finger: 1 index, 2 middle, 3 ring, 4 pinky. Above the diagram, an O means play that string open with nothing pressed down, and an × means leave it out — either skip it with your pick or rest a fingertip against it to keep it quiet.
That is the whole system. Every chord chart you will ever meet uses it, which is why learning to read one is worth the sixty seconds it costs.
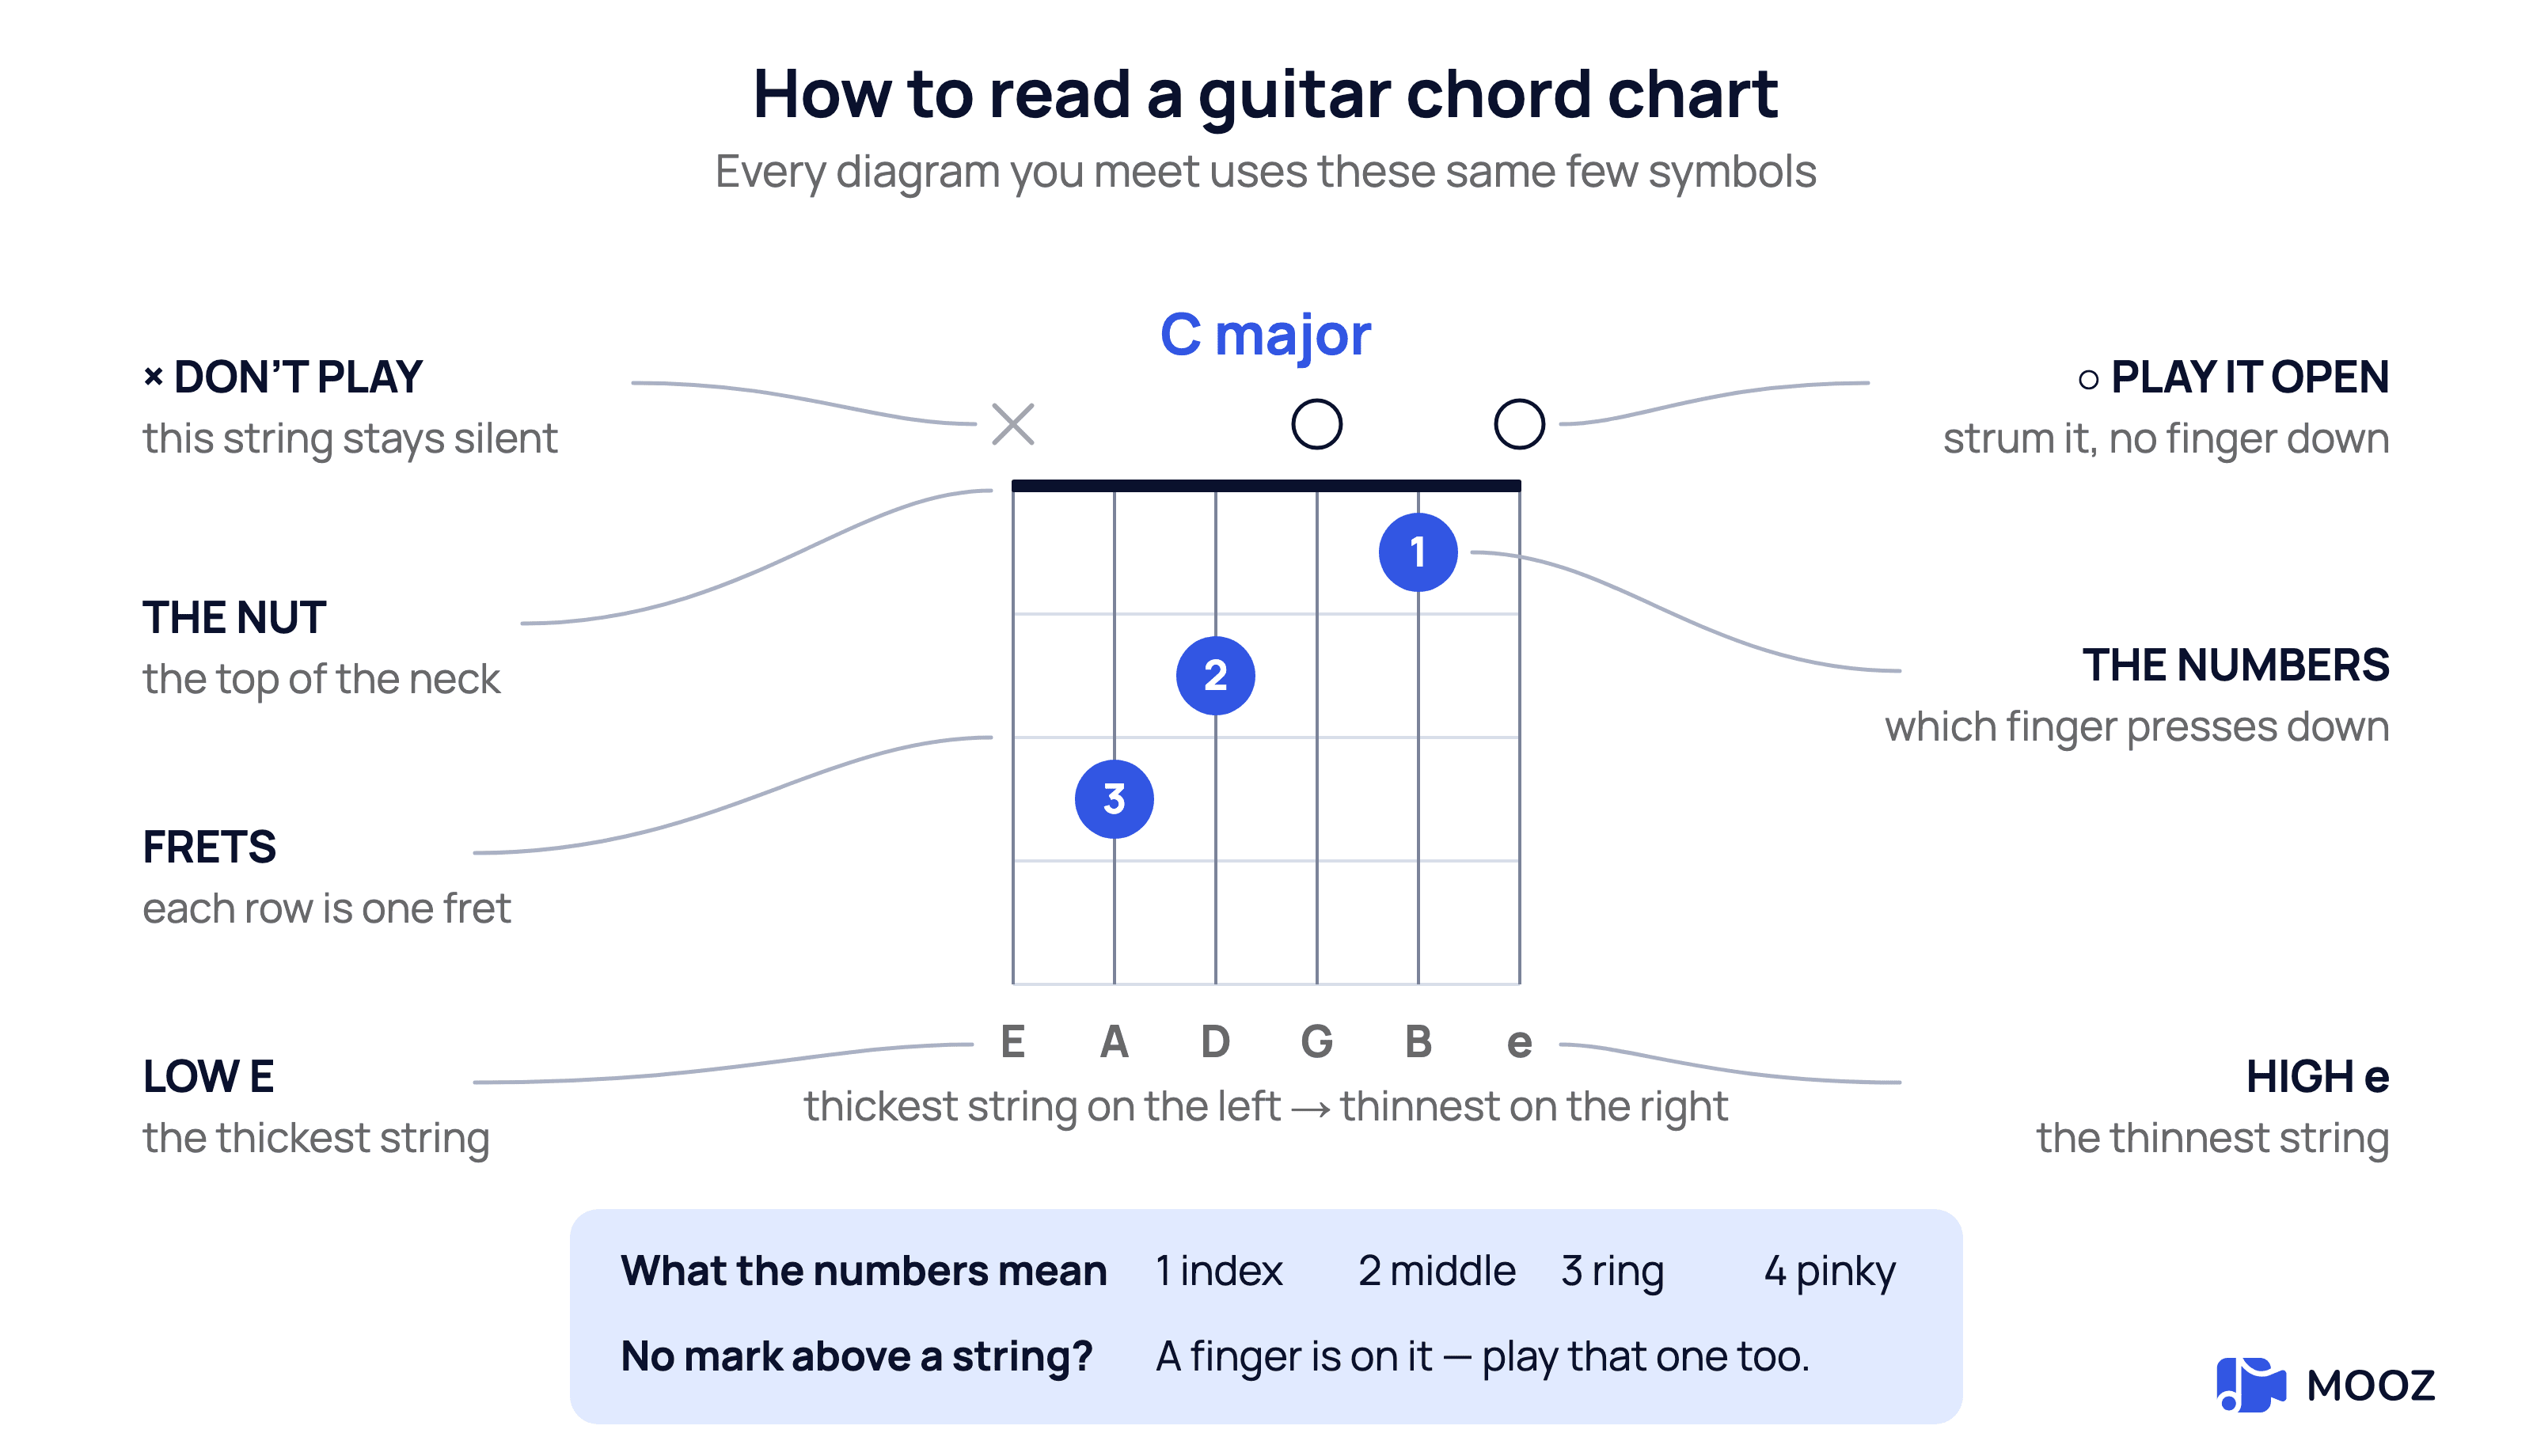
How to read a guitar chord chart — O means play the string open, × means leave it out, and the numbers are your fingers.
The one thing that trips people up: “low E” means low in pitch, not low in the air. Hold the guitar in playing position and that thick low E is the string nearest your chin — and it is the leftmost line on every diagram.
The only beginner guitar chord chart you need
Here are all eight, in the order I would teach them. Print this, or keep it open on a second screen — a chart propped next to your music stand beats a phone you have to unlock and look away for.
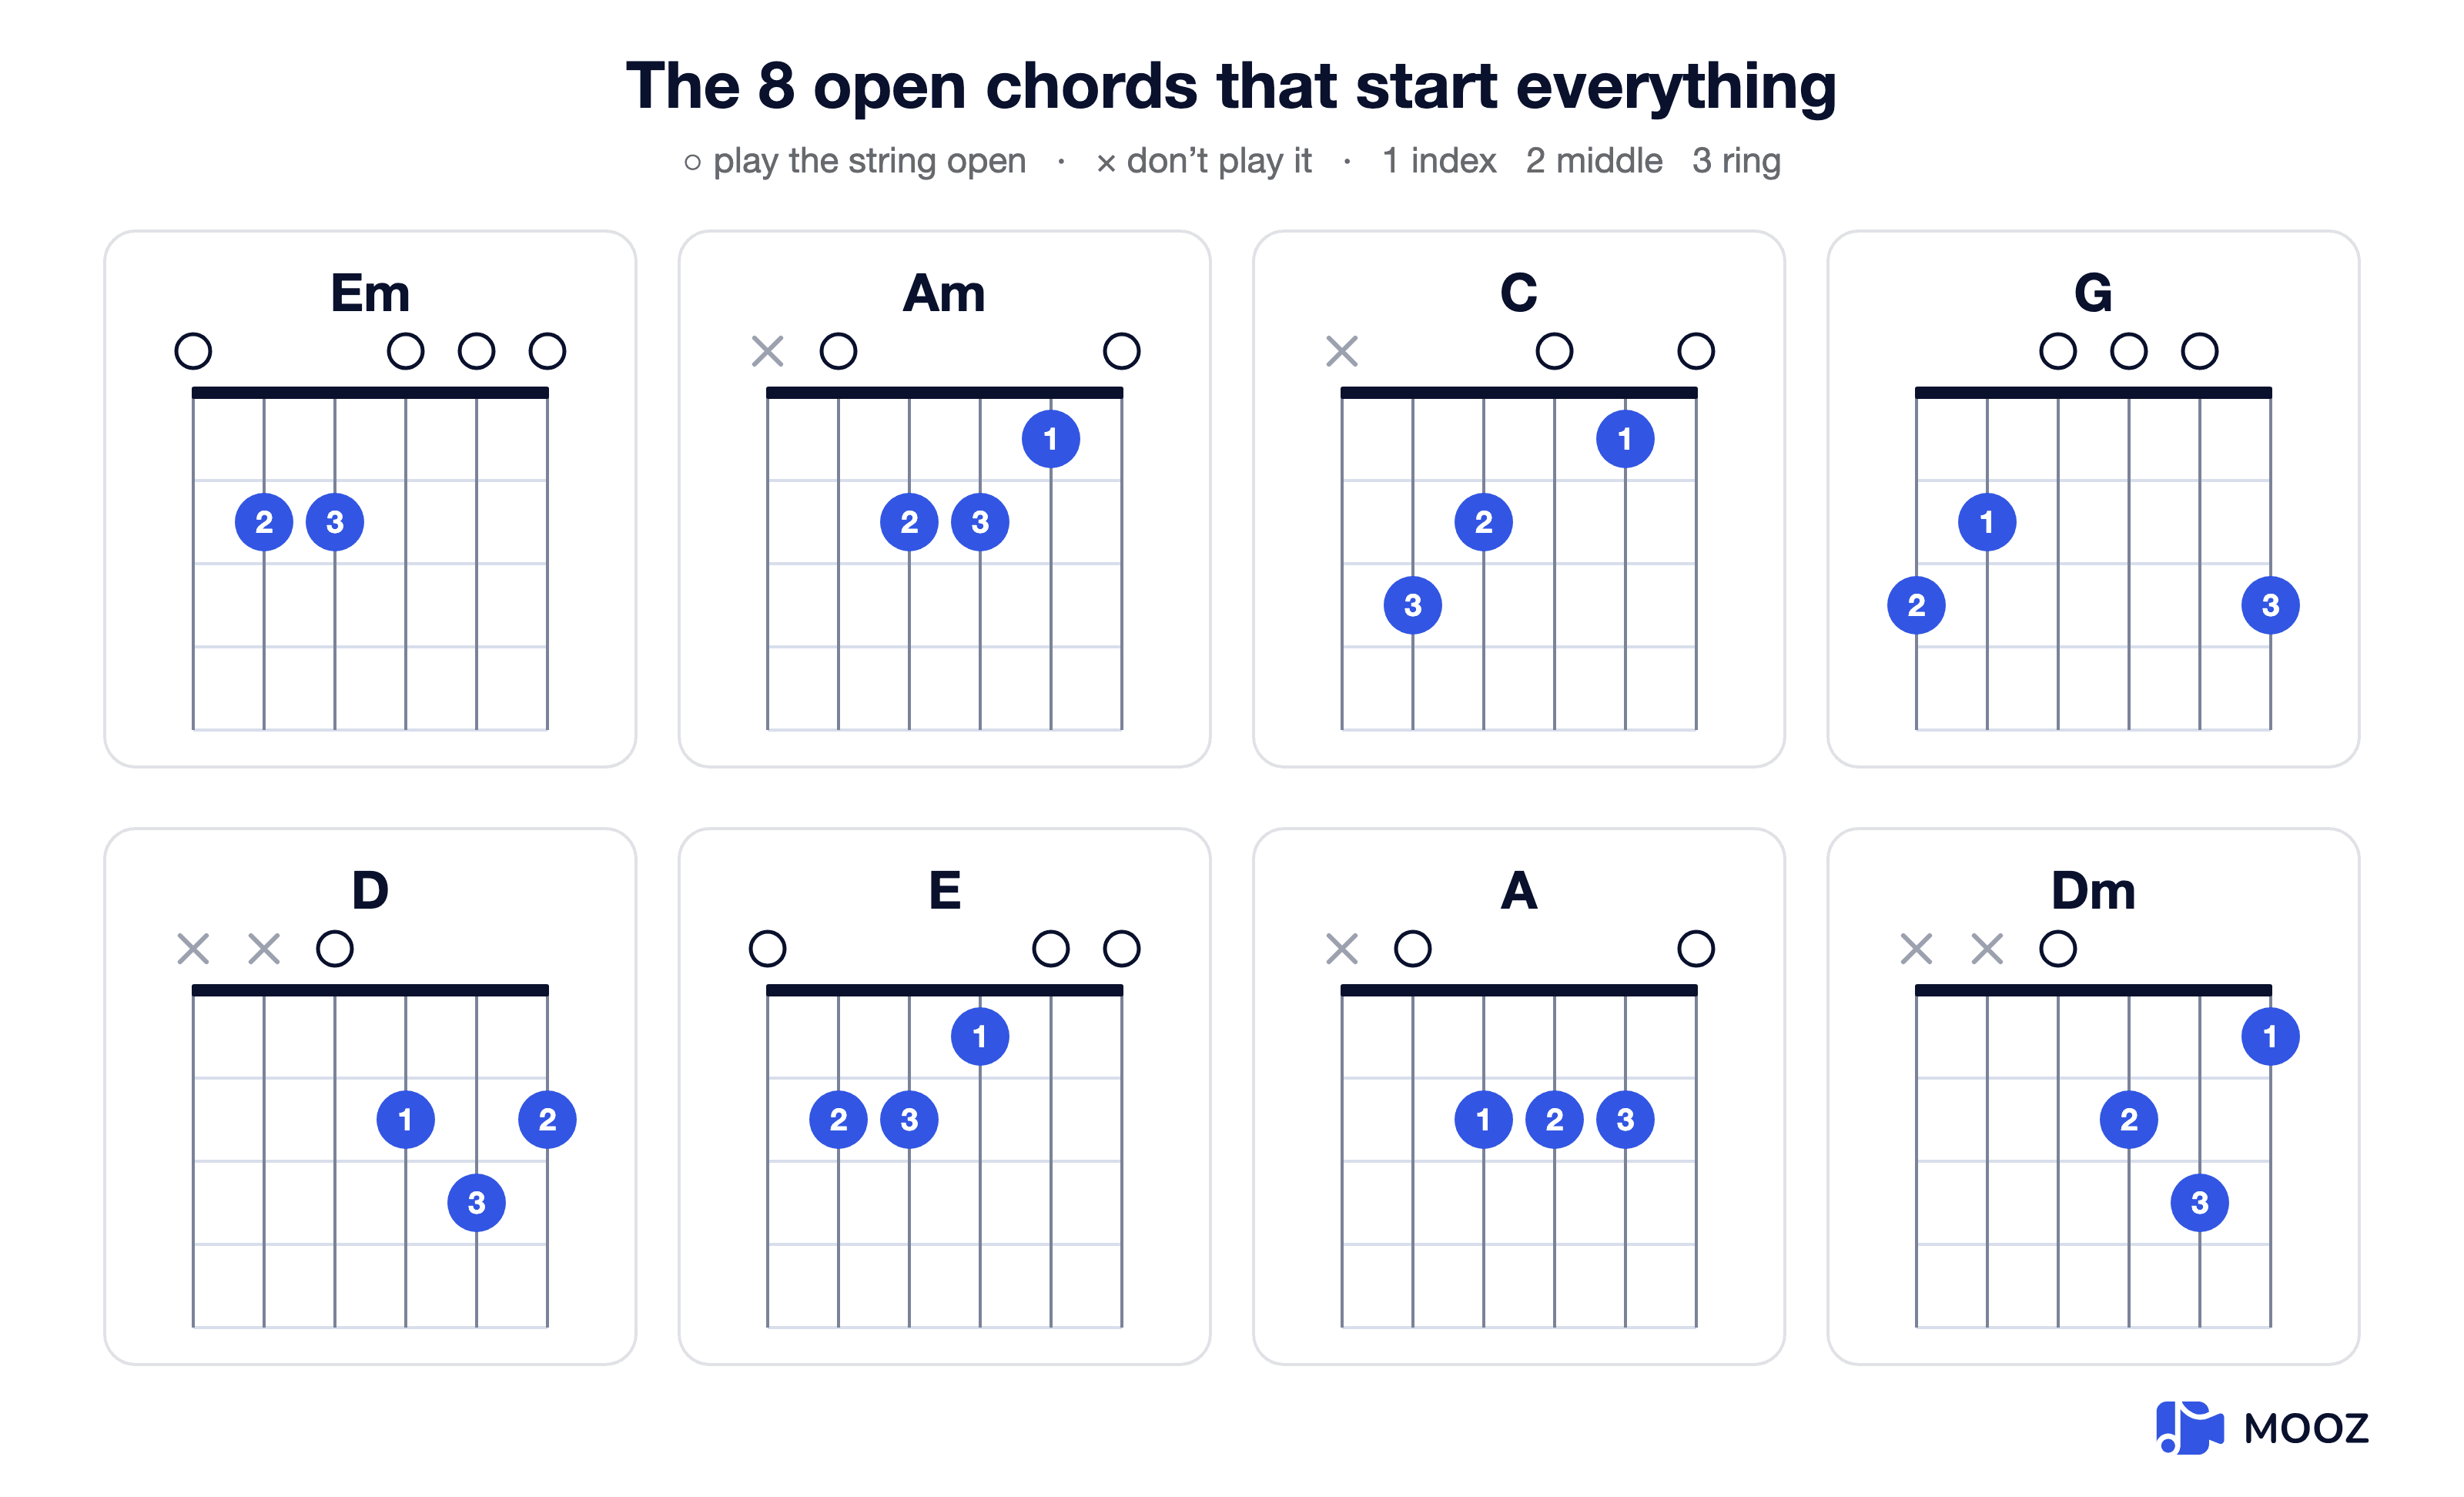
The complete beginner guitar chord chart — eight open shapes, no barre, nothing past the third fret.
1. Em — the easiest guitar chord there is
Two fingers, all six strings, nothing muted and no string to avoid. The diagram has the exact fingering. If you have owned a guitar for an hour, you can play this one today.
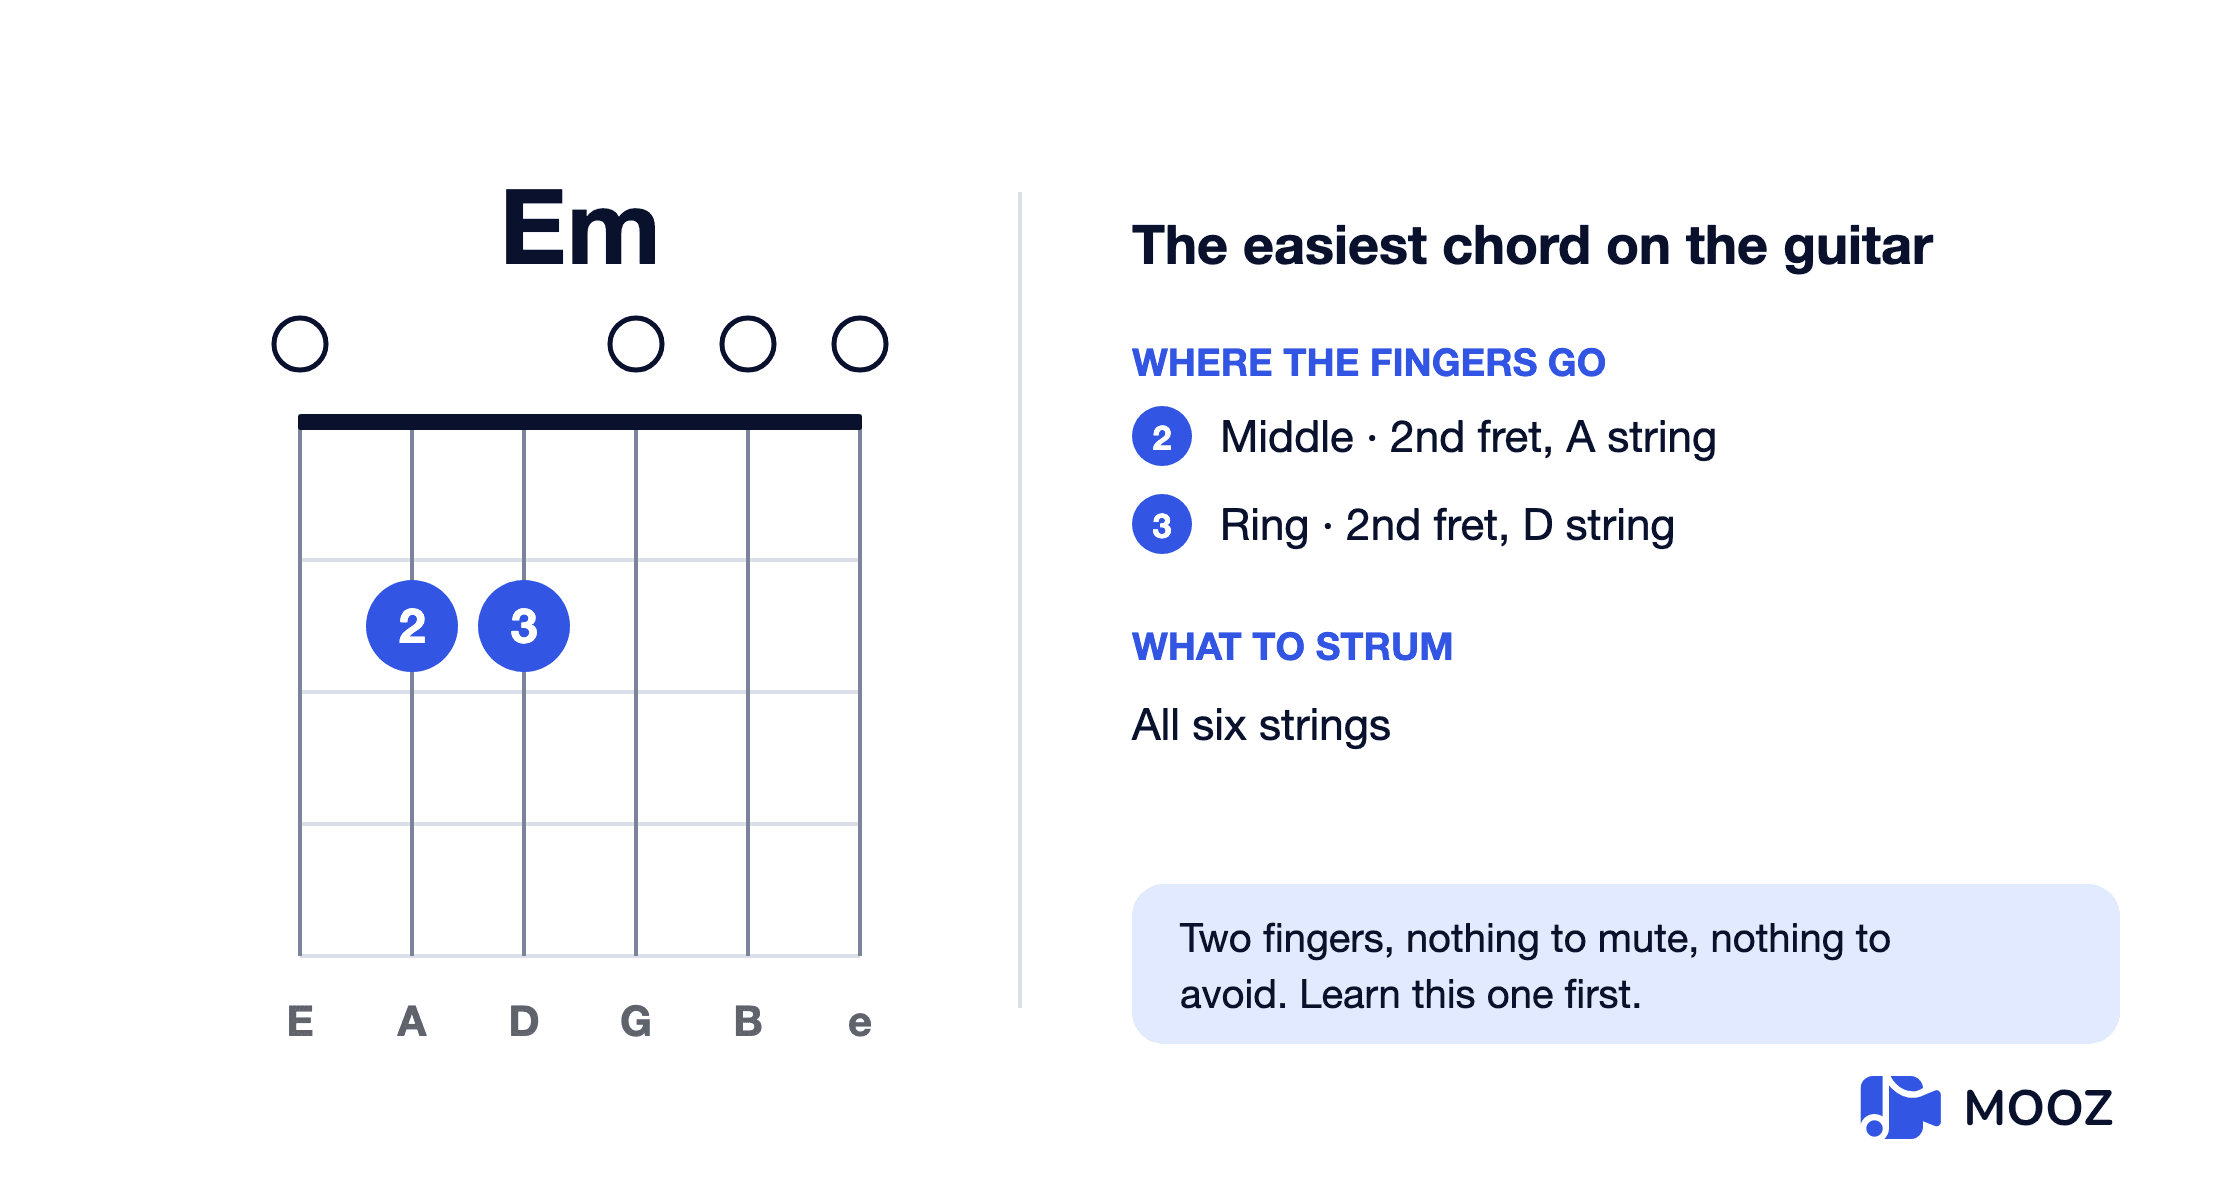
Em — two fingers, all six strings, nothing to avoid
2. Am
A compact shape that sits neatly in the hand: five strings, with the low E left out. Coming from Em, the two fingers you already have each slide one string across — middle from A to D, ring from D to G — while the index drops onto the B. Nothing stays put, but nothing travels far either.
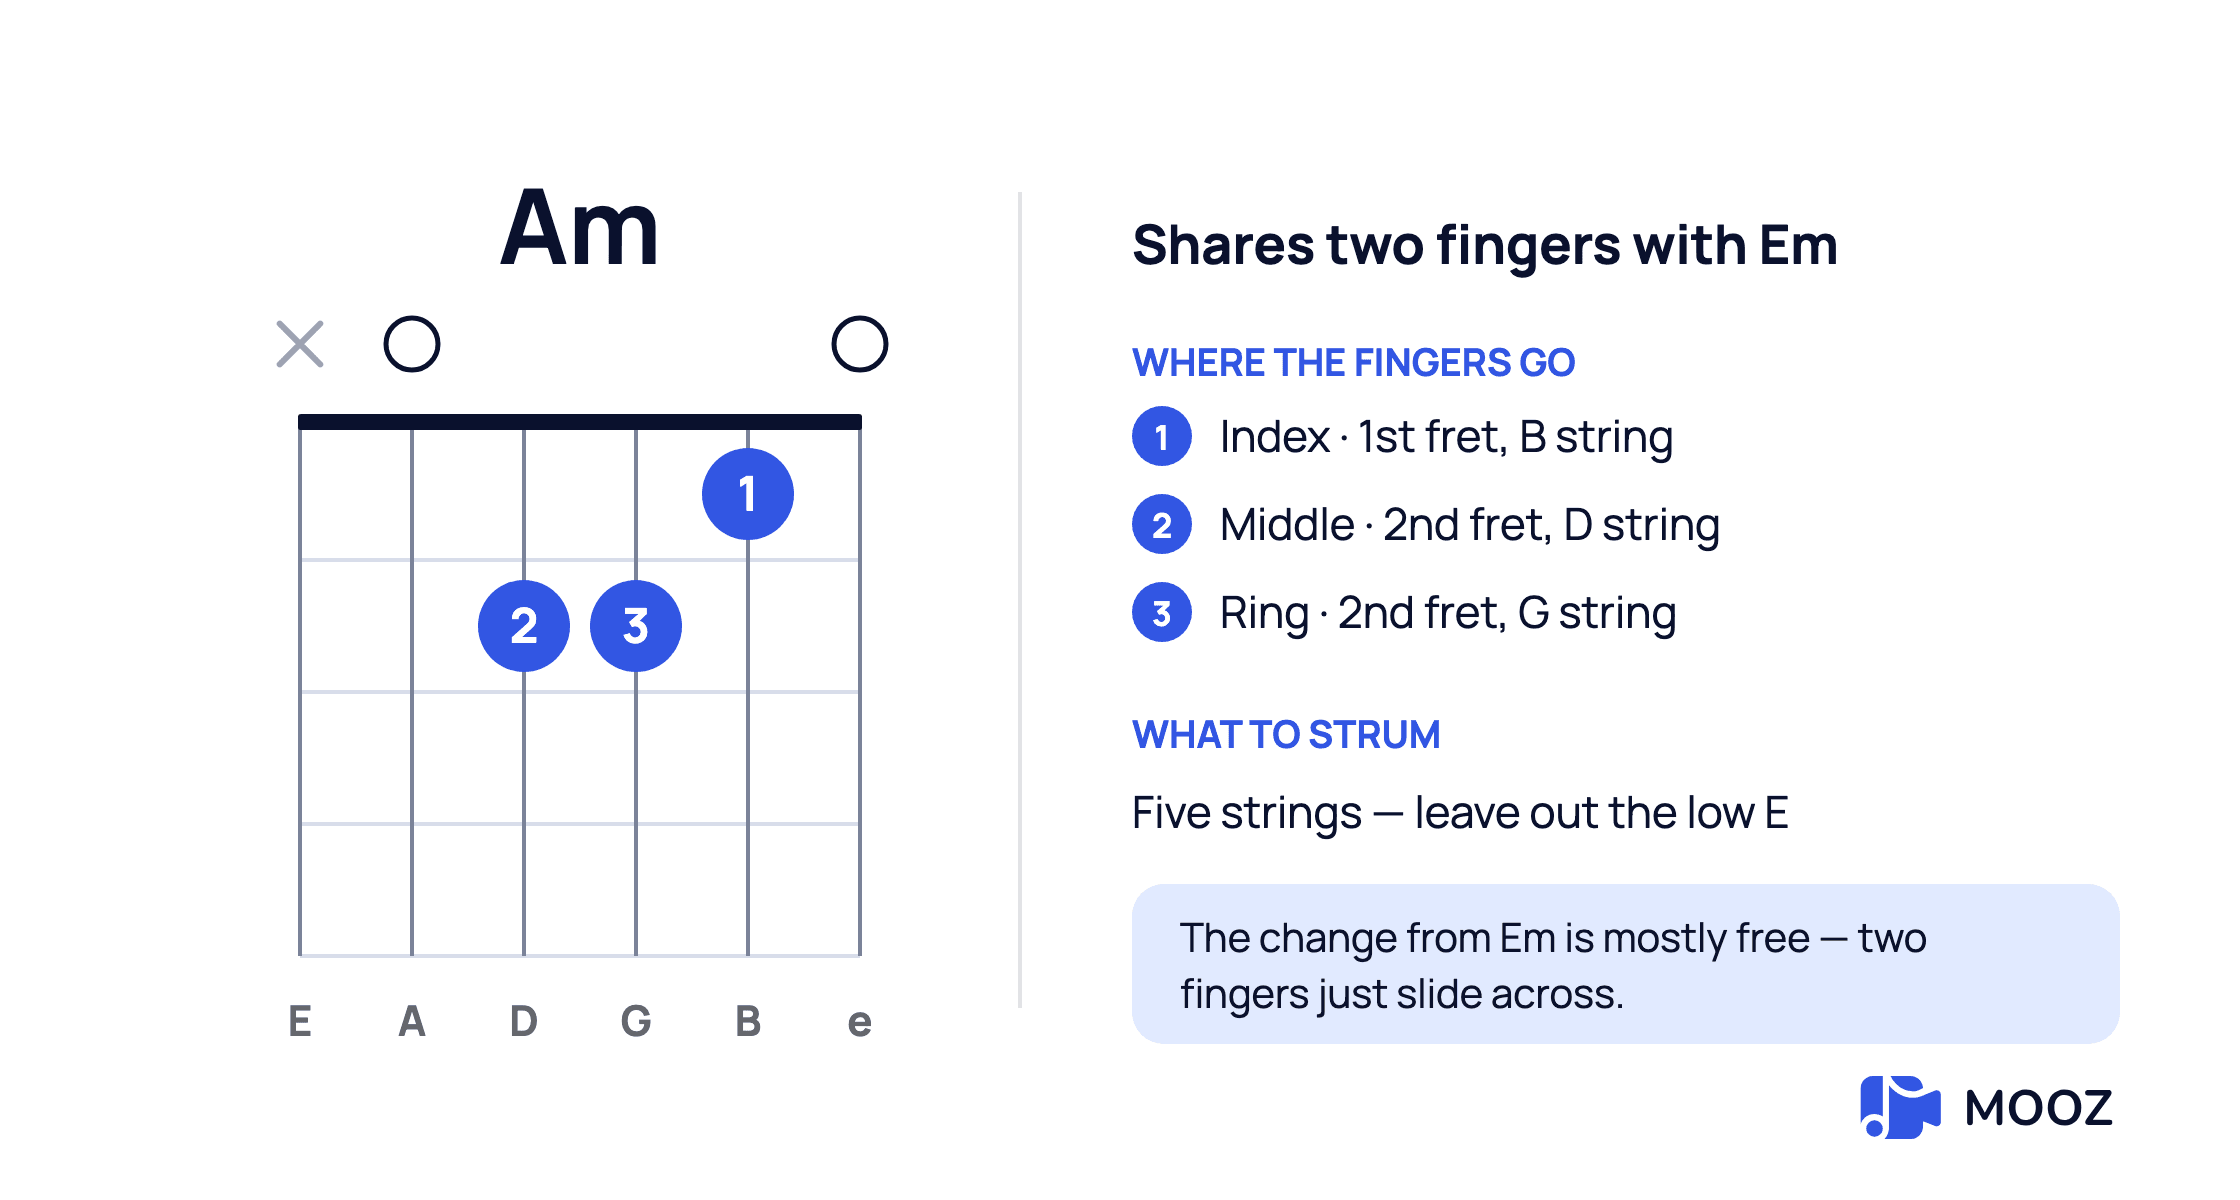
Am — the same two fingers slid one string across, plus the index on B
3. C major
Five strings again, skipping the low E. This is the first shape that genuinely stretches you — that diagonal reach from middle finger to ring finger takes a few days to stop feeling absurd. Keep your fingers arched or the ring finger will flatten out and kill the open G string.
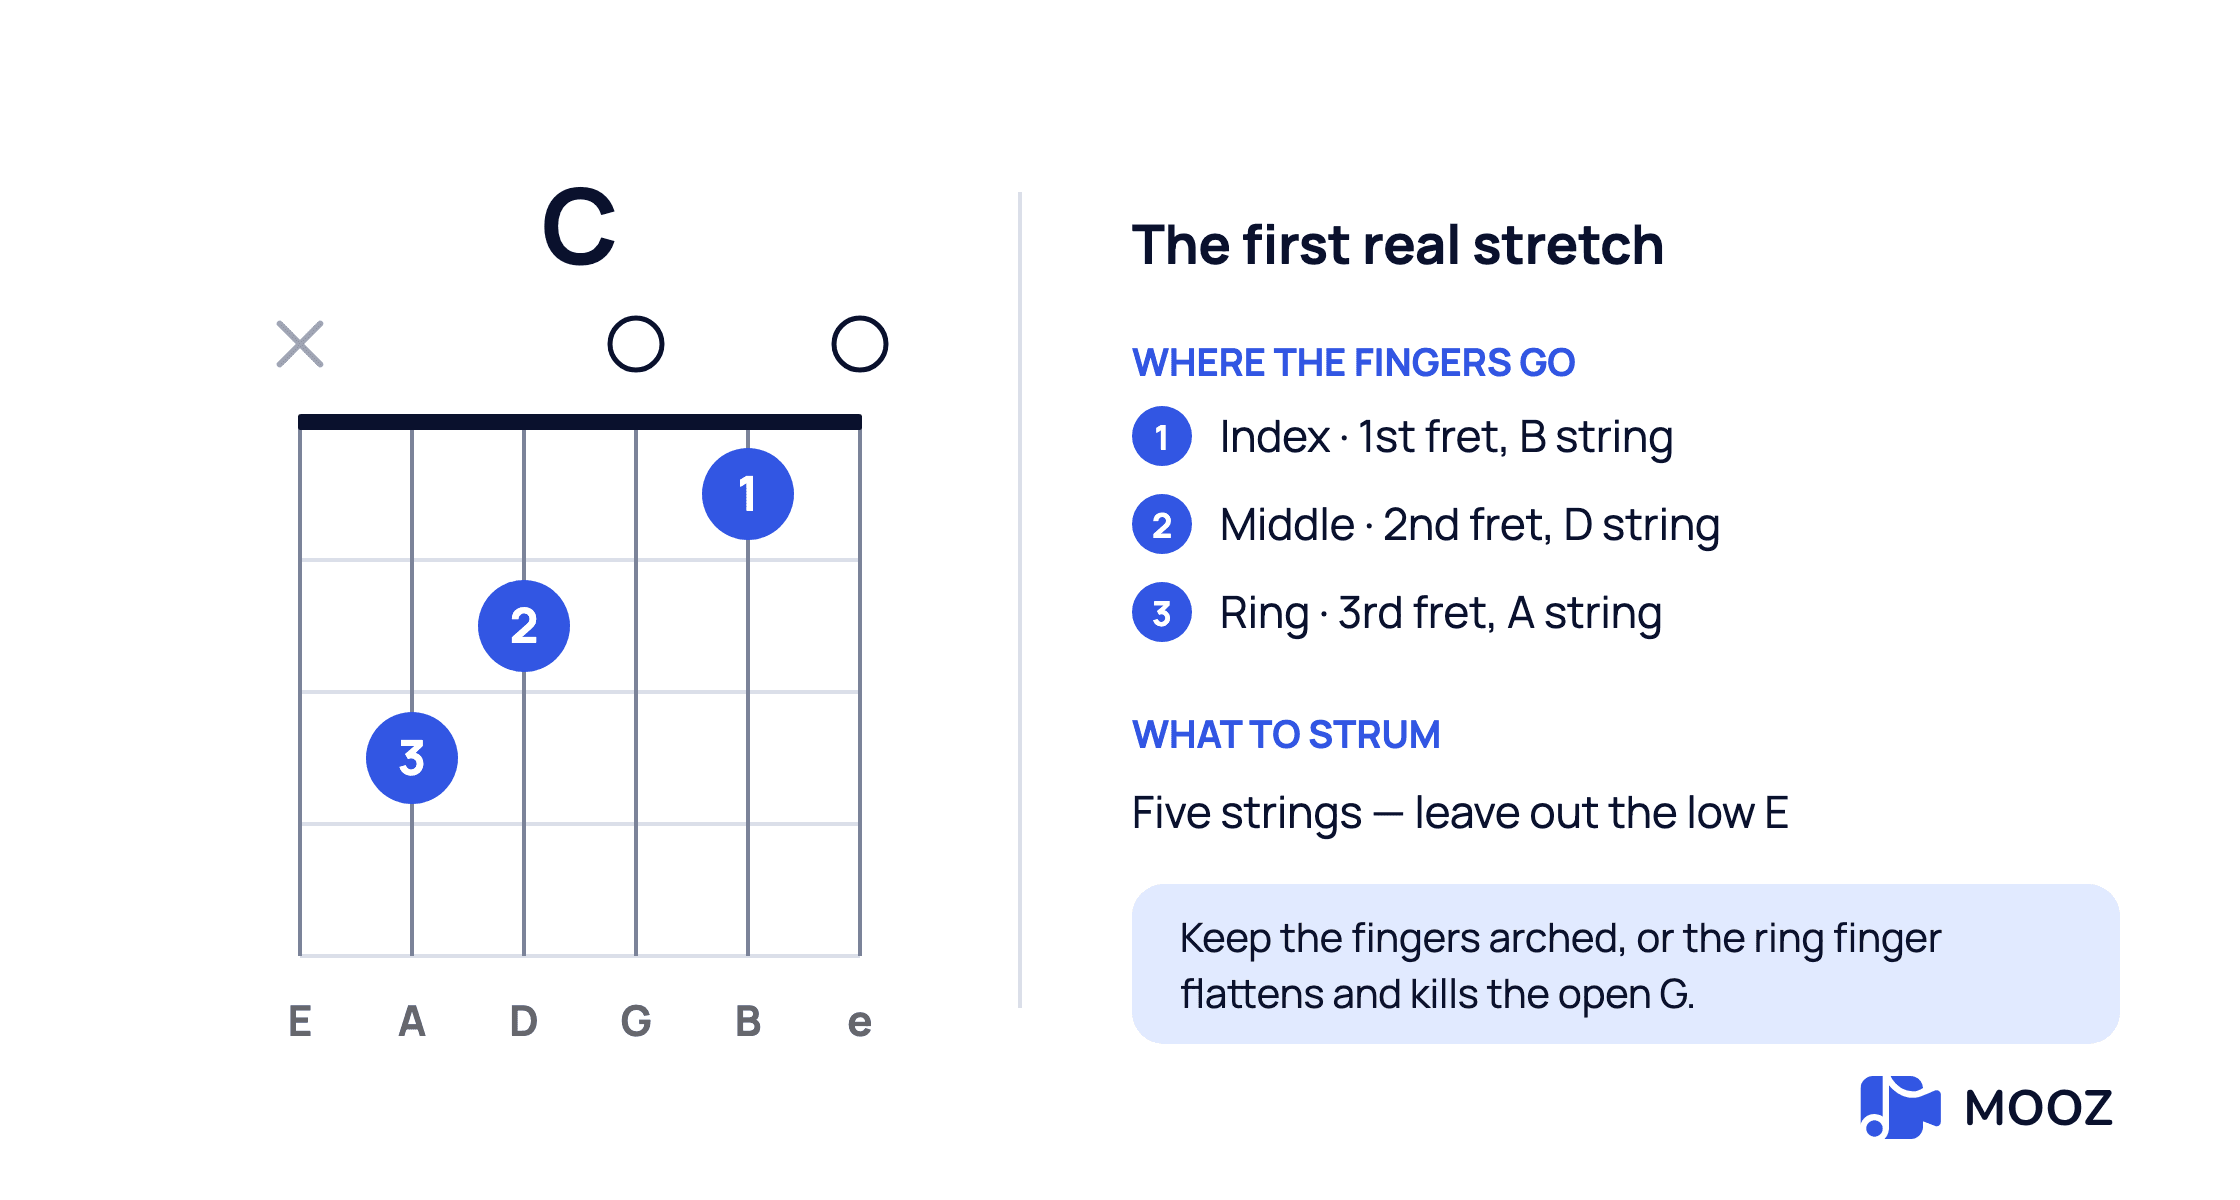
C major — the diagonal reach that takes a few days to settle
4. G major
All six strings ring, which is why it sounds so big for only three fingers. There is a four-finger version that adds the pinky on the 3rd fret of the B string and sounds fuller, and it is worth learning eventually because it makes the change to C much easier. Start with three.
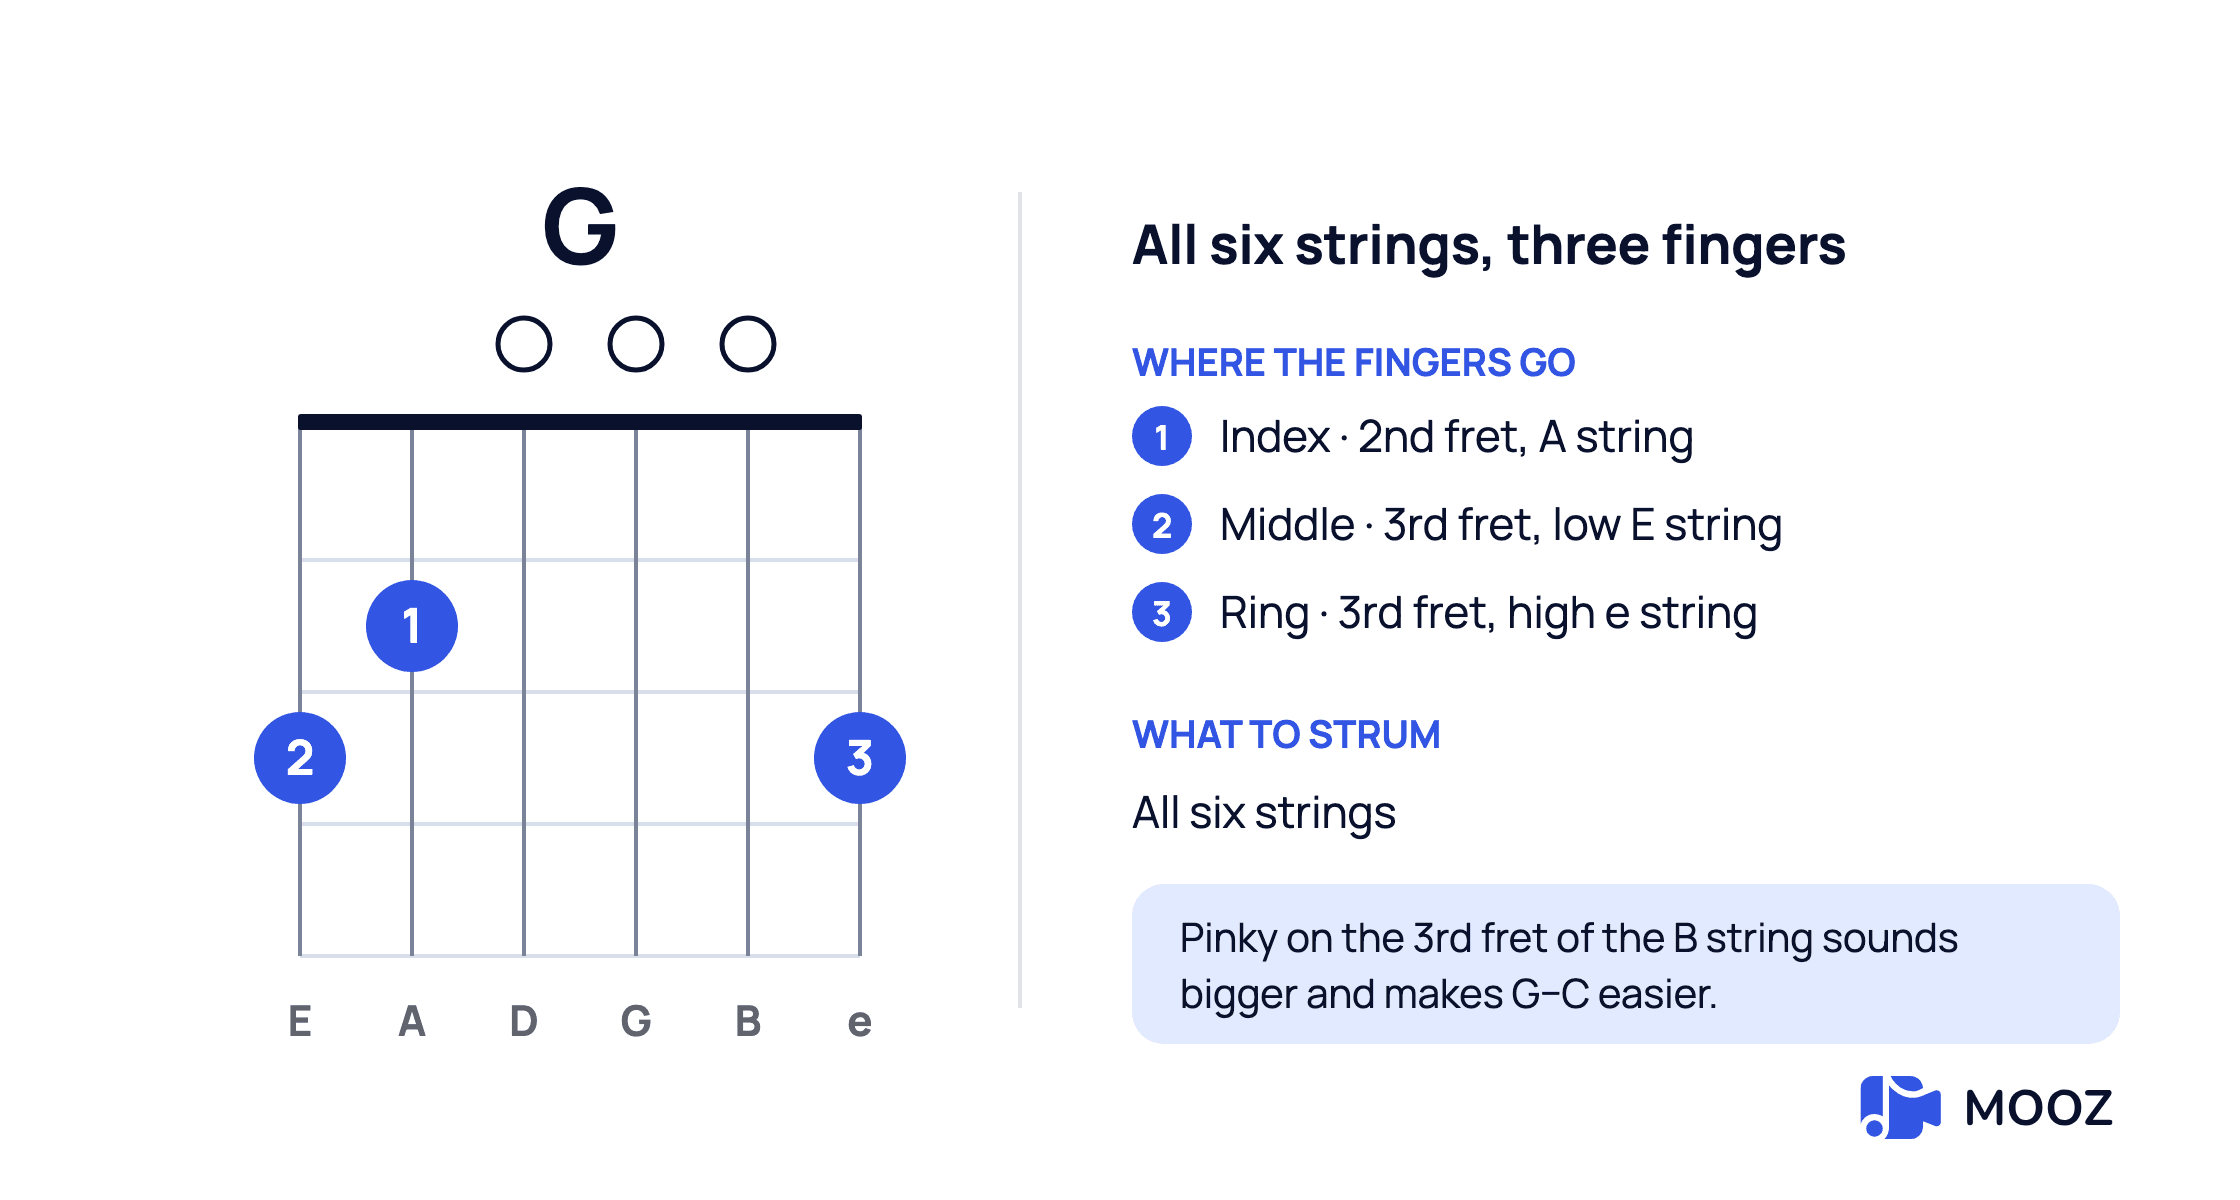
G major — all six strings ring
5. D major
Only four strings here — leave both the low E and the A alone. The three fingers make a small triangle crowded onto the top strings, and the usual complaint is that the high e comes out dead. That is your ring finger leaning over. Arch it.
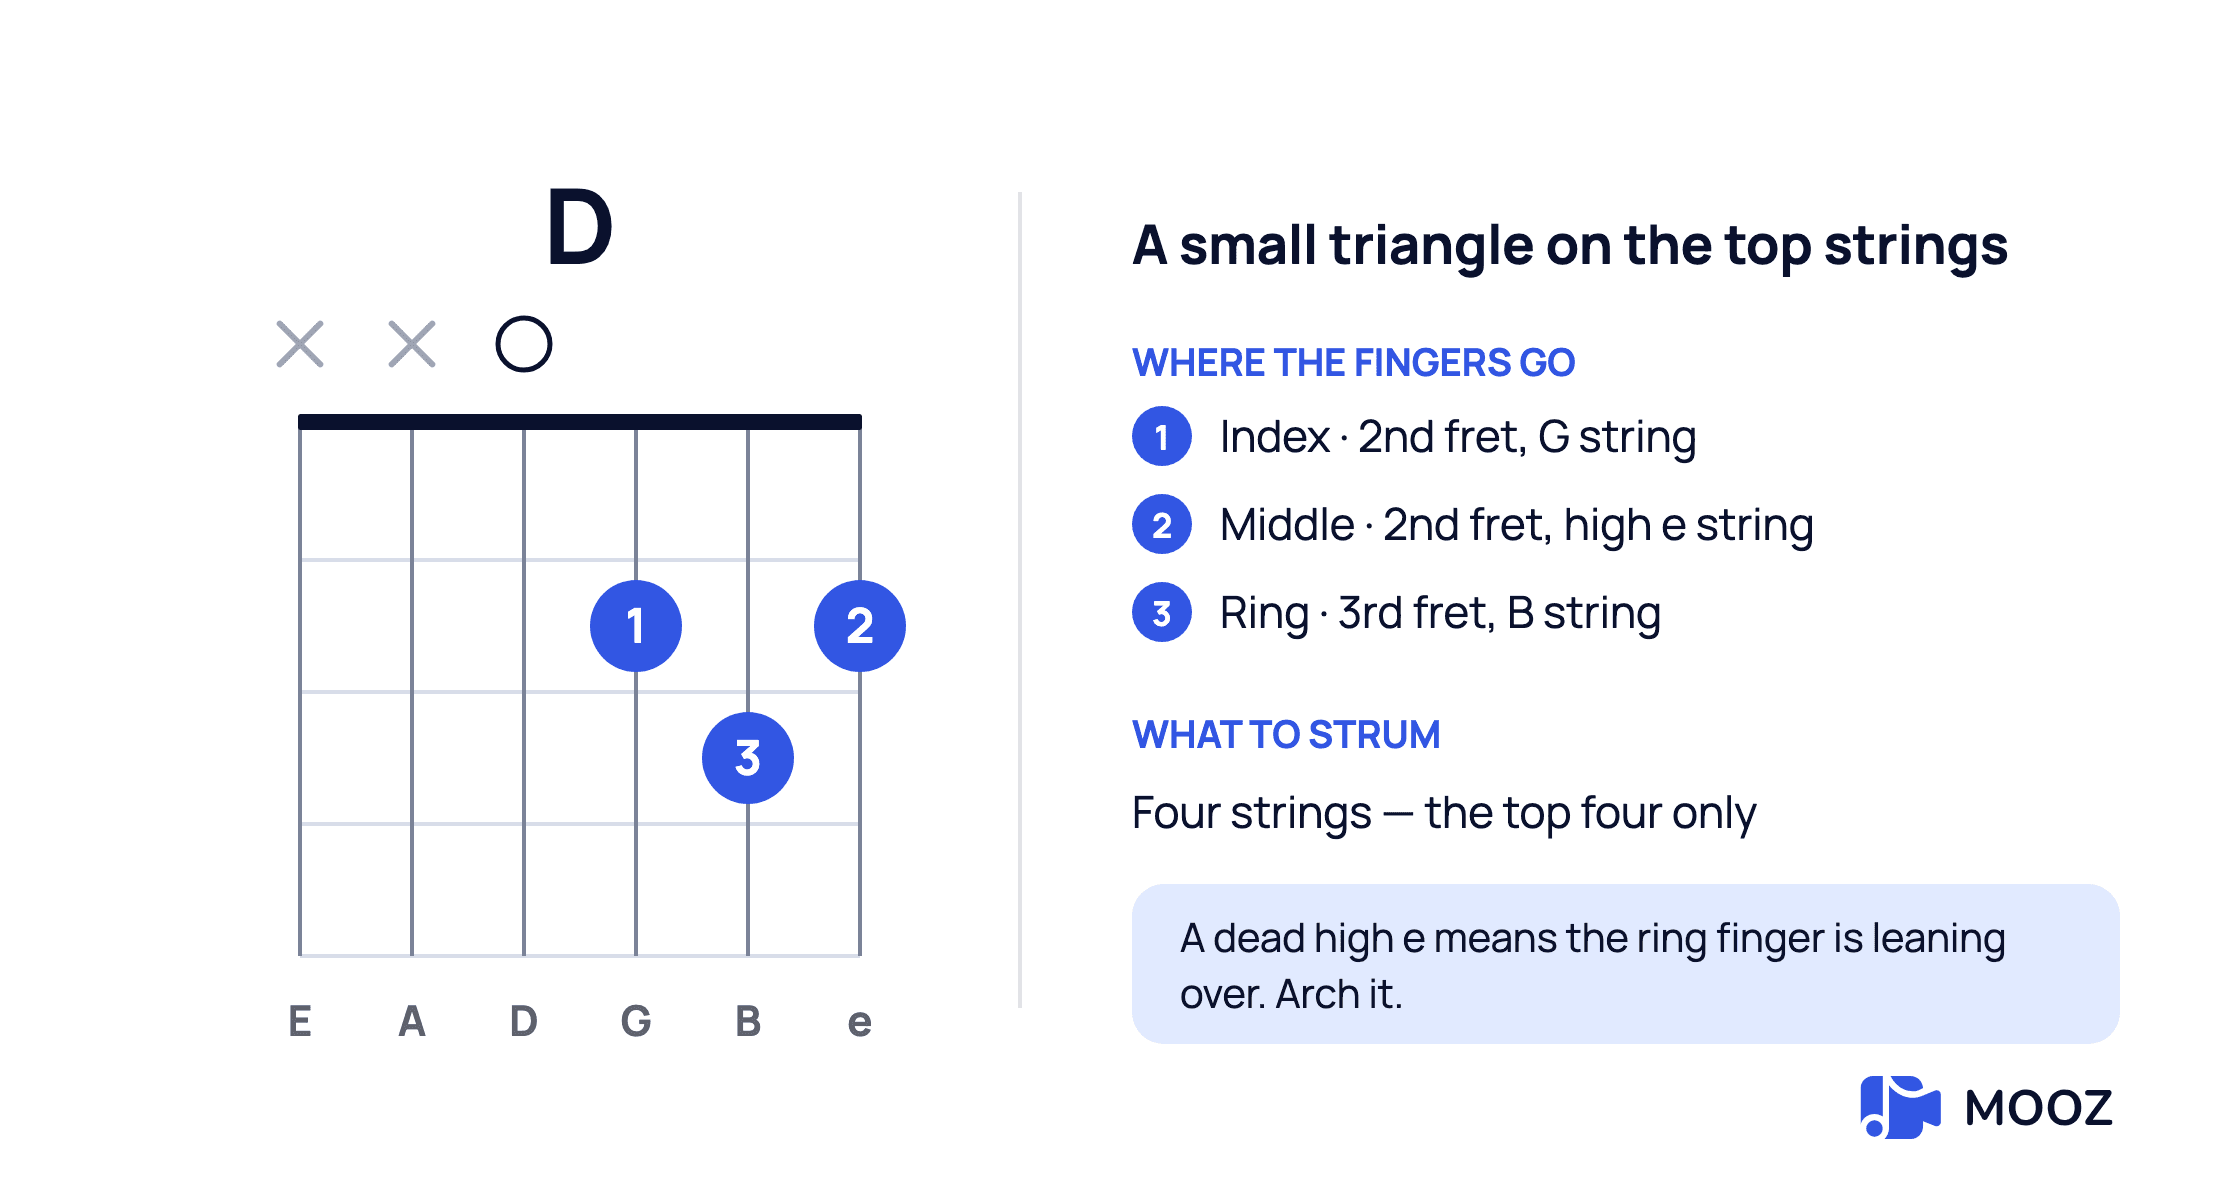
D major — four strings, three fingers on the top end
6. E major
All six strings, and look closely at the shape: this is Em with the index finger added on the G string. You already know most of it.
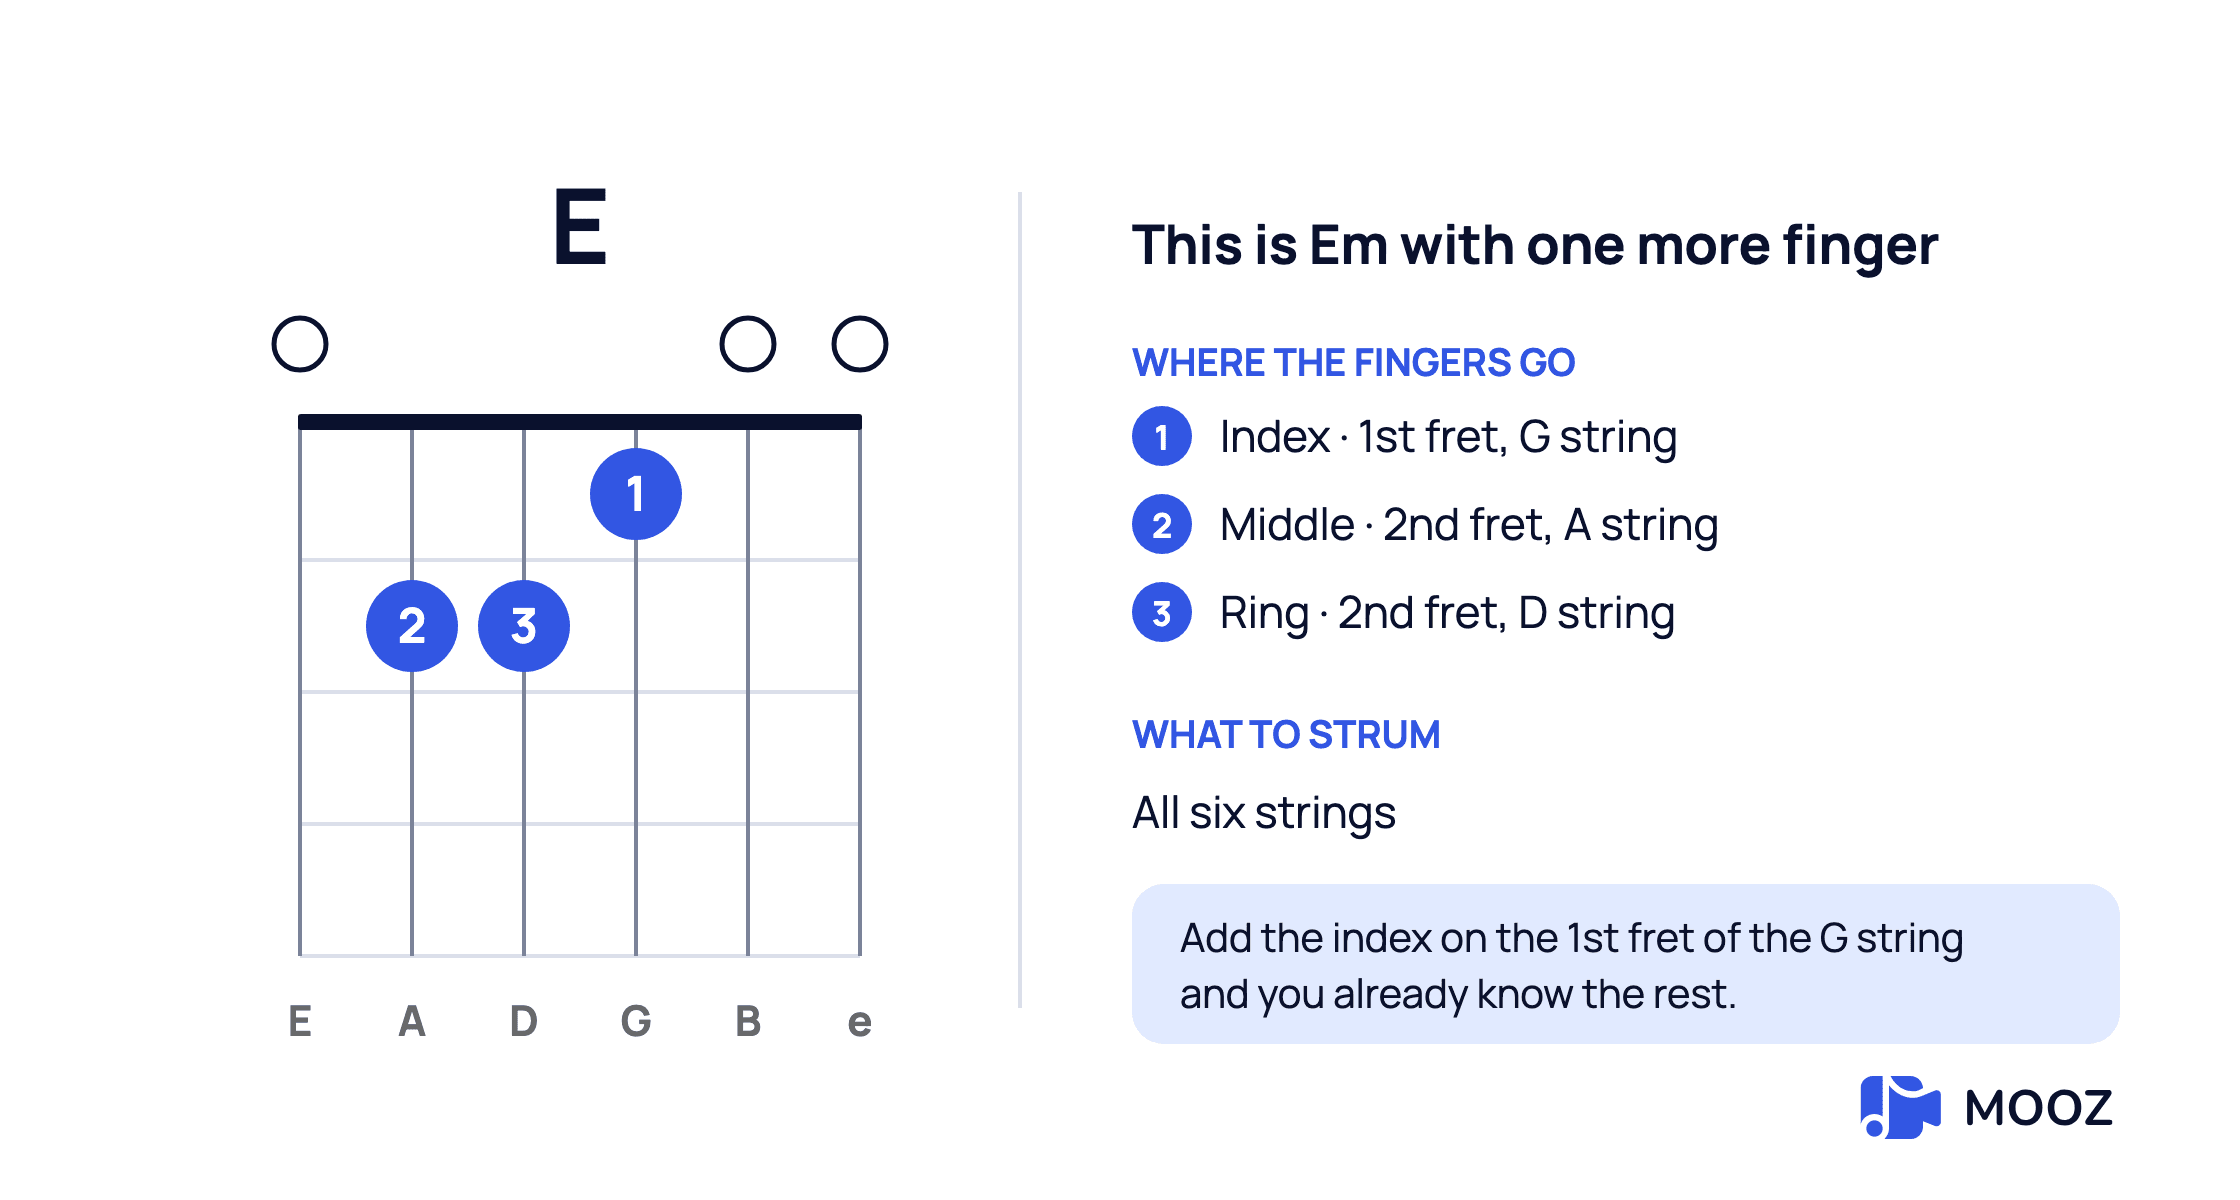
E major — Em with the index finger added
7. A major
Five strings, skipping the low E. Three fingers crammed side by side into a single fret is a tight fit, and the high e is the string that usually suffers. If your hands are large, try rolling one finger flat across all three strings instead — plenty of players do it that way.
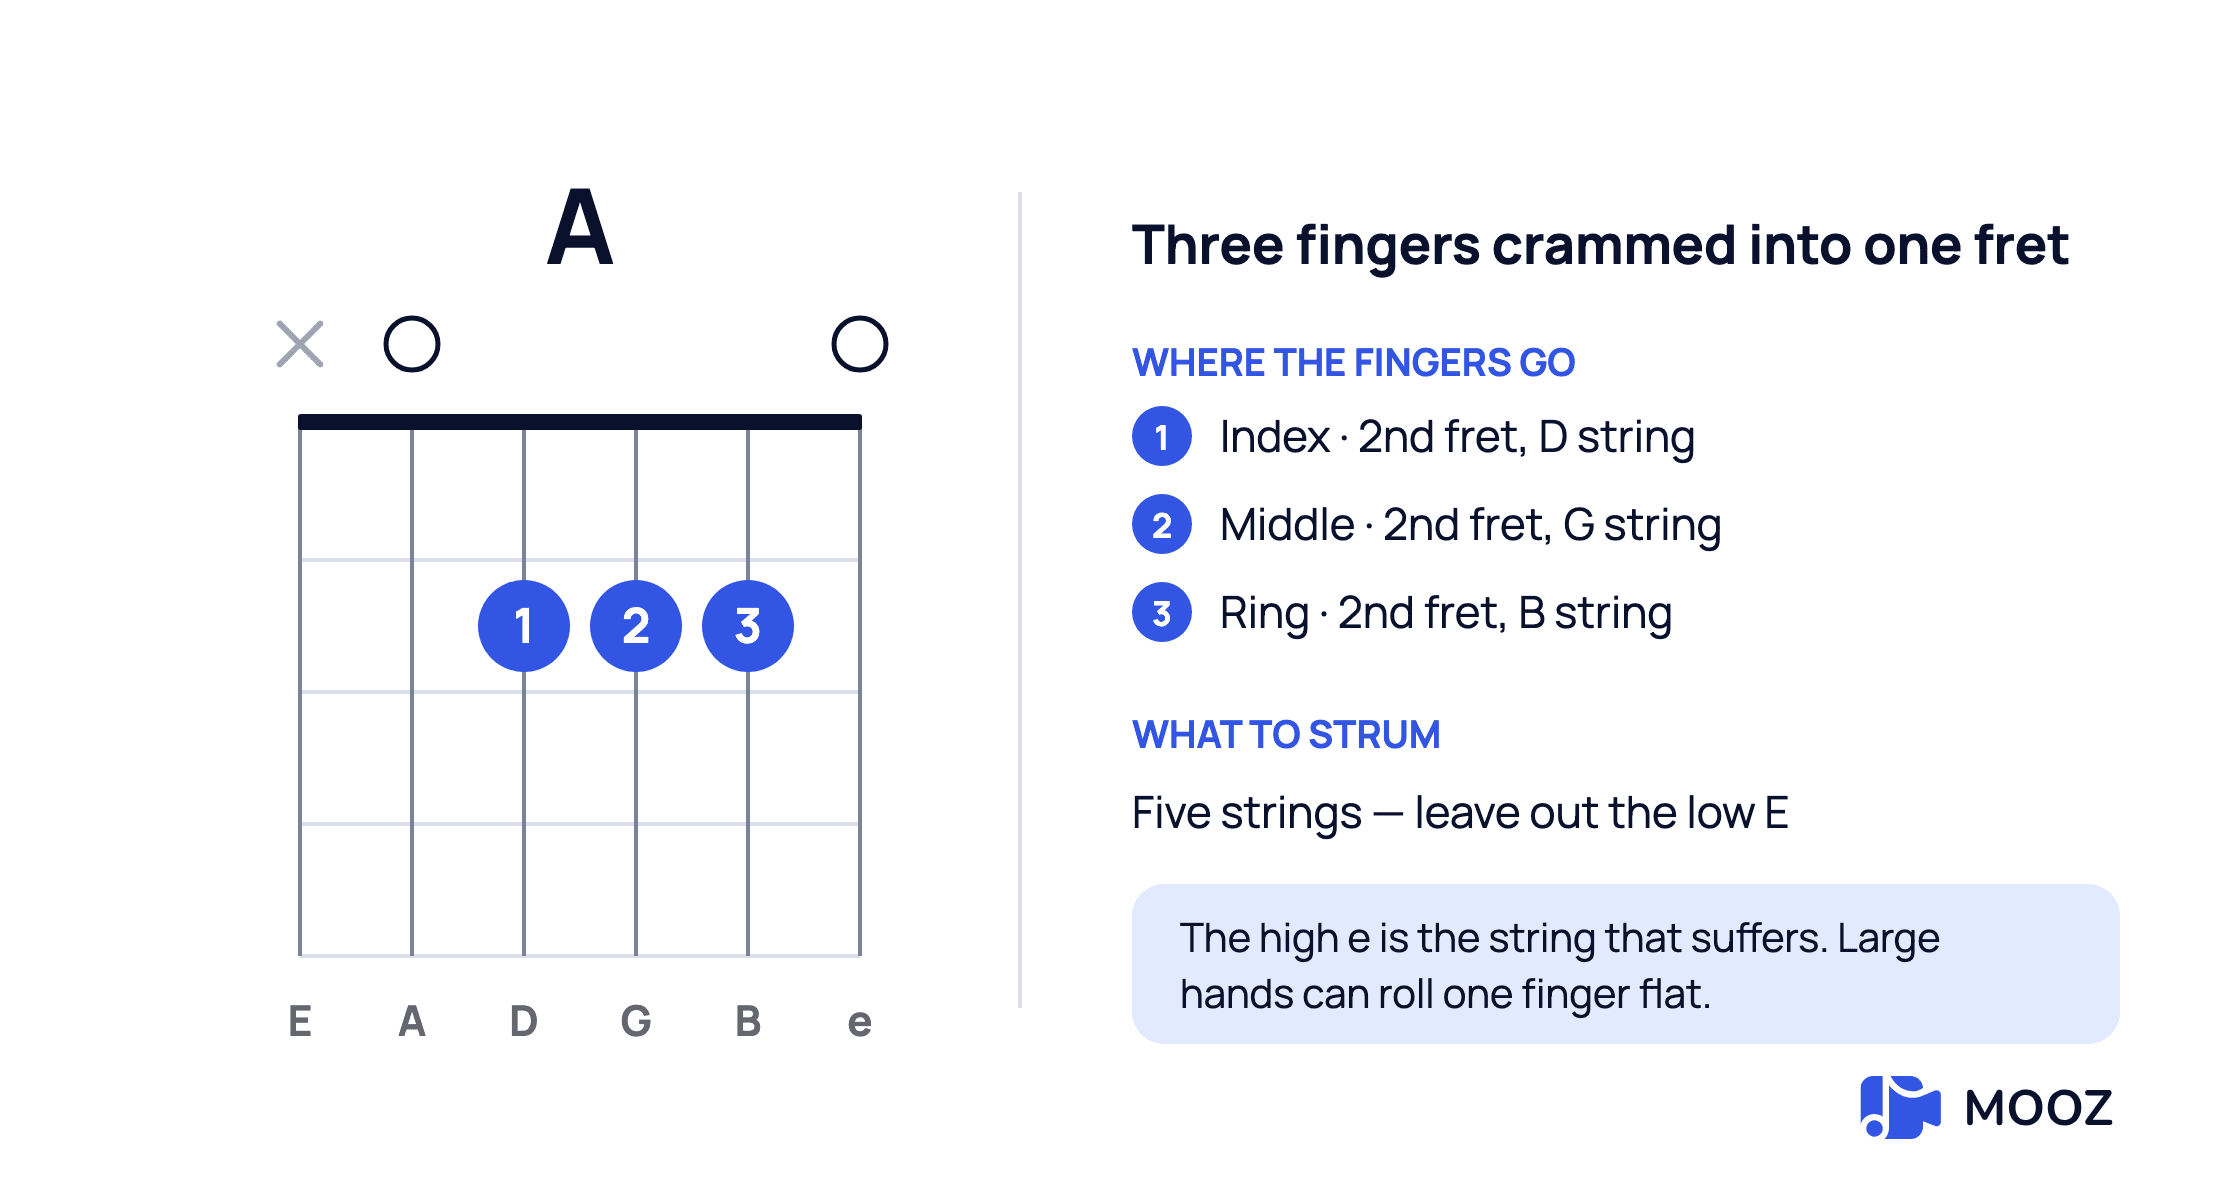
A major — three fingers sharing the 2nd fret
8. Dm
Four strings, the same four as D major. In fact it is D major with the index finger moved from the G string to the high e. Learn it right after D while the shape is still fresh.
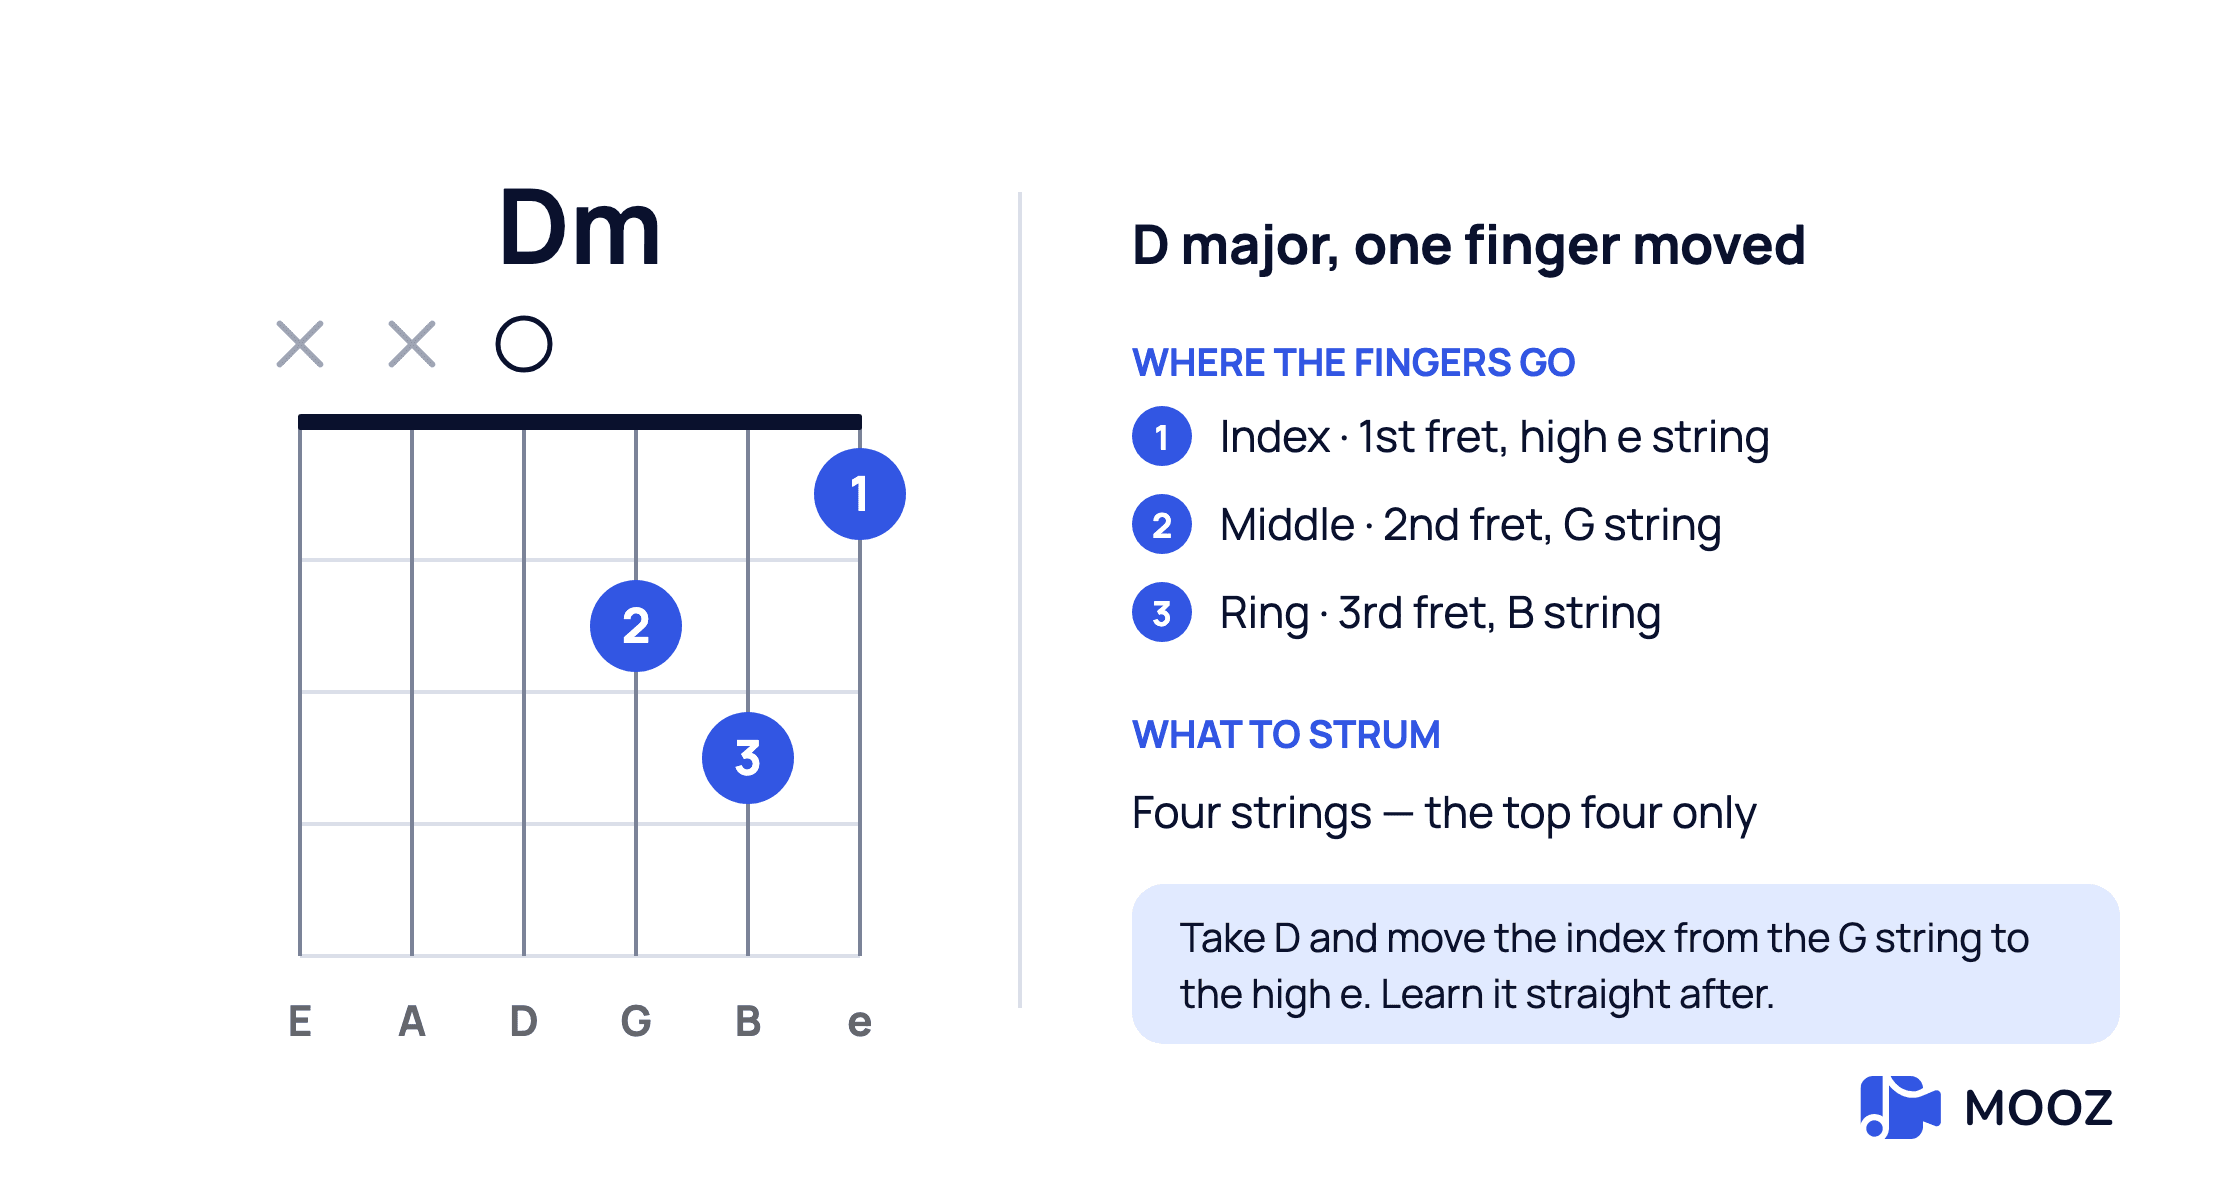
Dm — D major with the index moved to the high e
Why these eight and not another eight
Open strings are doing a lot of quiet work here. Every one of these chords leaves at least one string ringing untouched, which means volume and sustain you get for free, without any pressure from your fretting hand. That matters enormously in the first month, when your hand simply is not strong yet.
The rest of it is geography. Everything sits in the first three frets, so your hand never leaves one position, and the same small set of finger combinations keeps recurring — which is exactly why strength builds as fast as it does. Between them these eight cover the chords that pop, rock, folk and country lean on almost to the point of embarrassment, and not one of them asks you to barre.
Barre chords come later, and they come much more easily once these shapes are automatic. Trying to learn a full F in week two is the single most reliable way to talk yourself out of the instrument.
Four progressions worth more than four more chords
Individual chords are not music. The changes between them are, and a handful of chord sequences show up so relentlessly across popular music that learning them is worth more than adding new shapes to your collection.
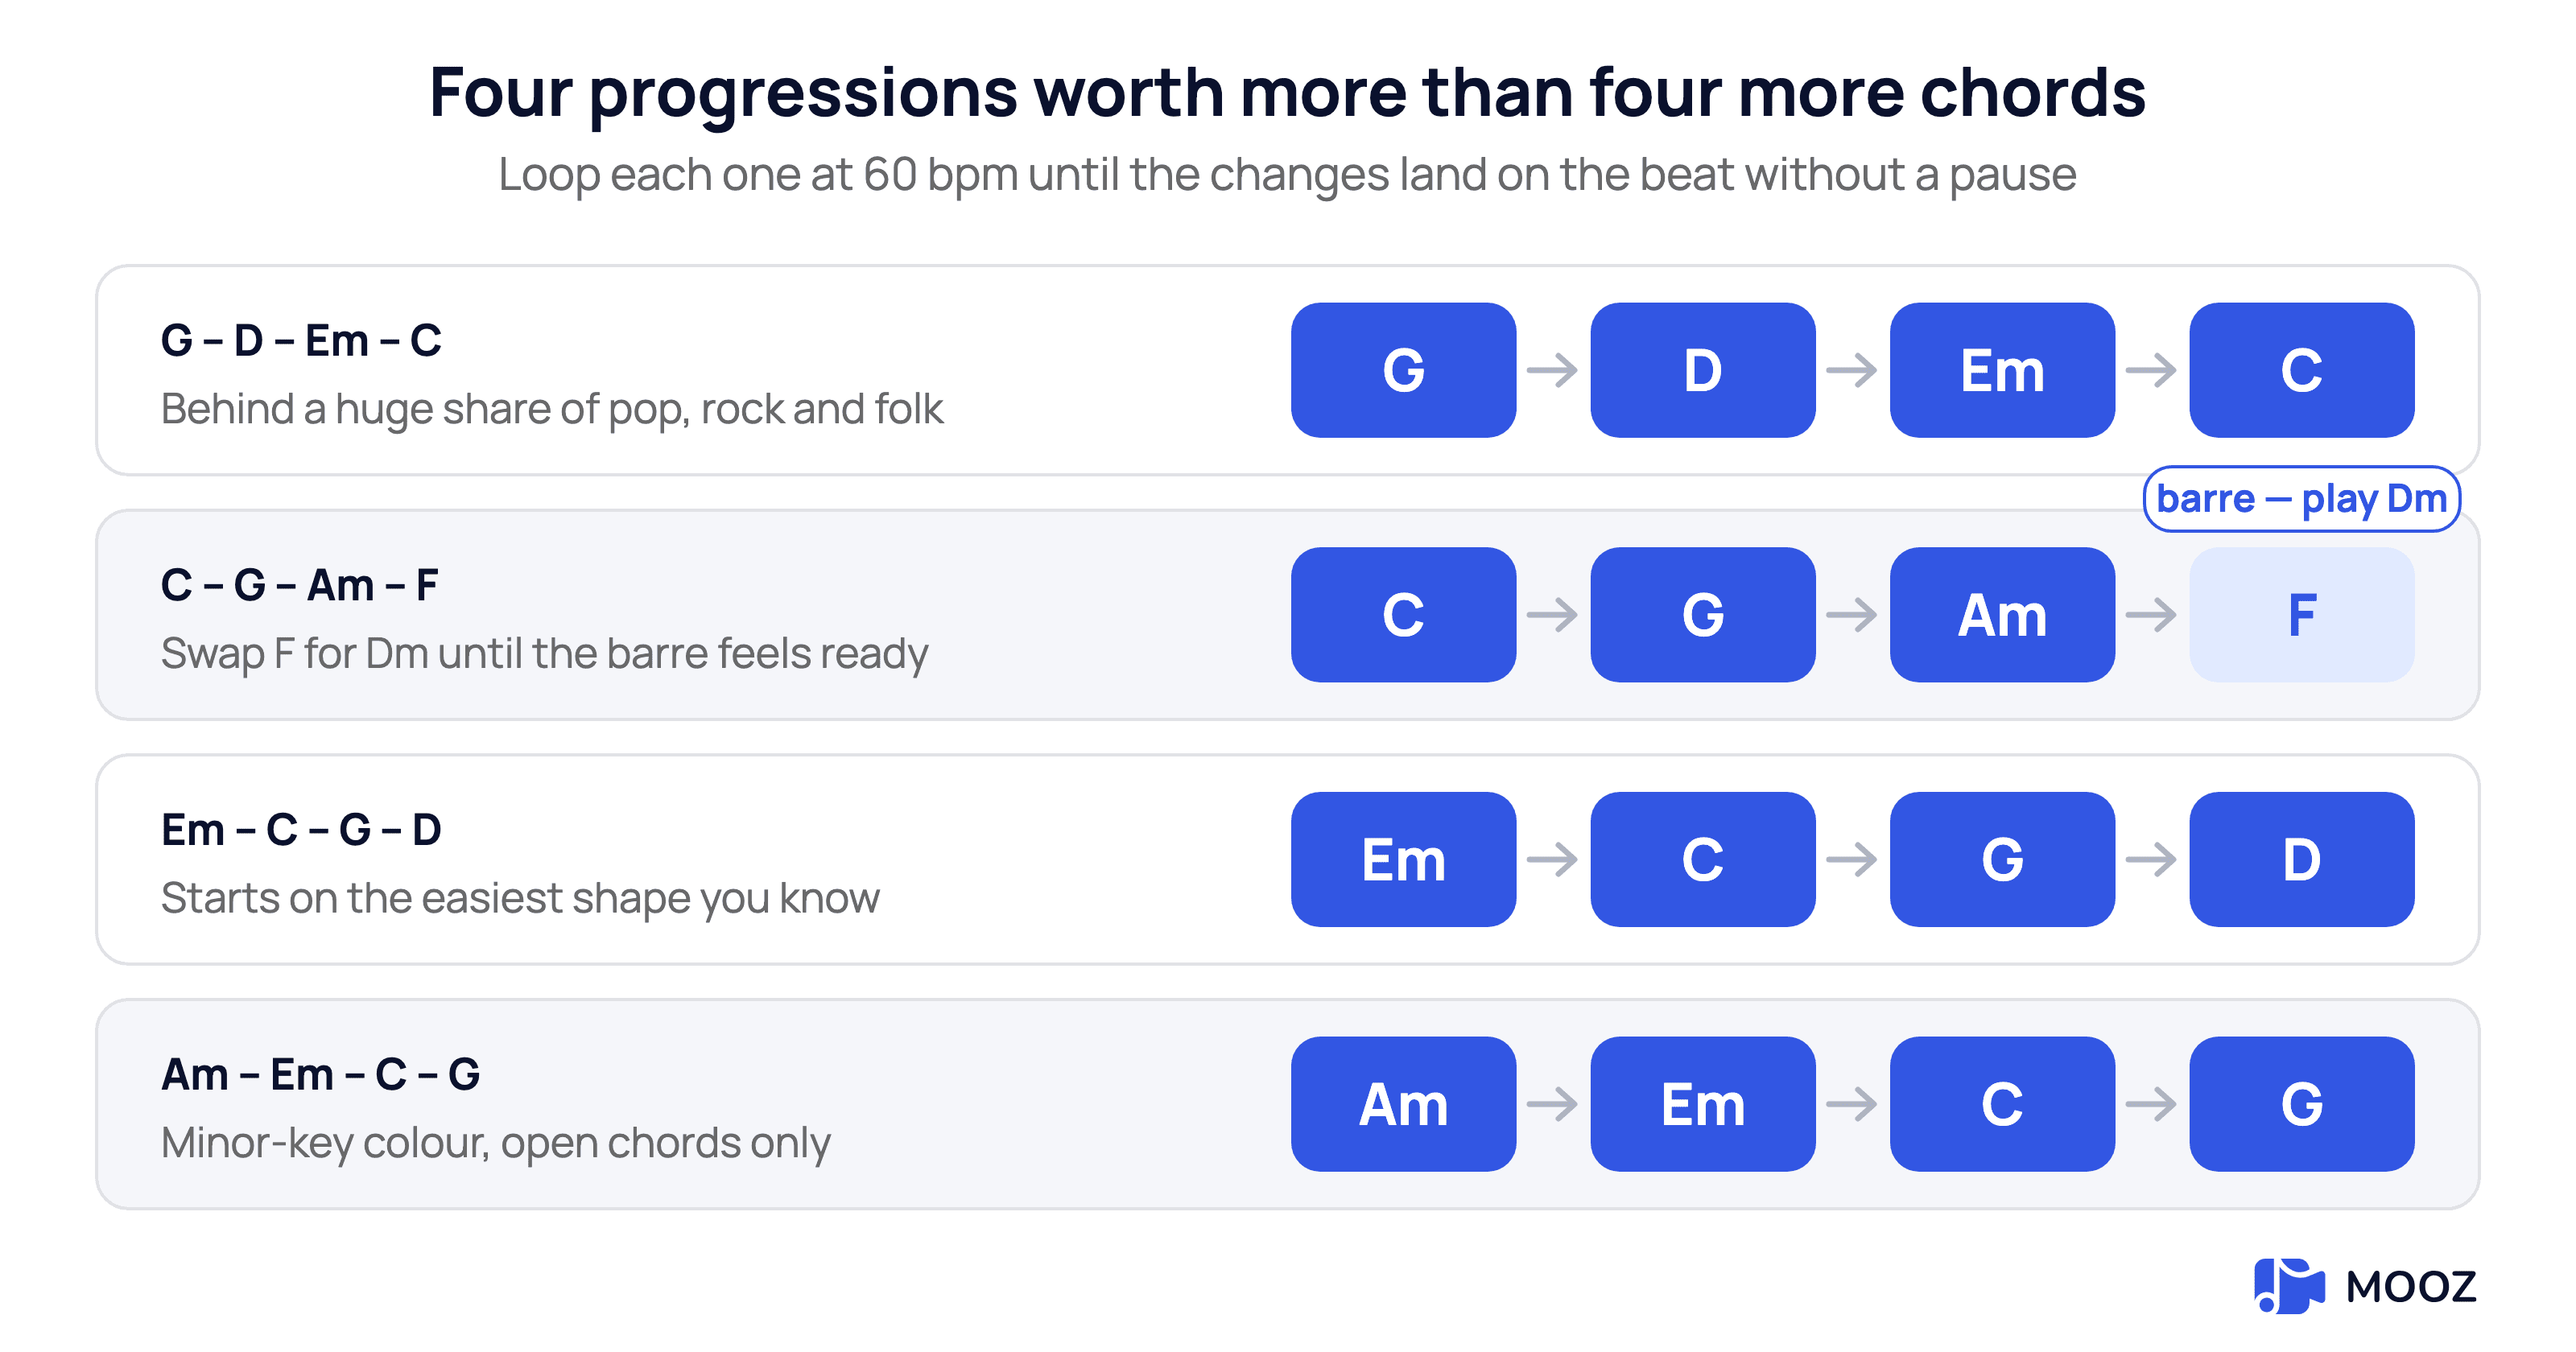
Three of these come straight from the eight shapes. The fourth needs an F — swap in Dm until the barre is ready.
Play each one at 60 bpm with a metronome, four beats per chord, round and round. Two things to watch: on G, make sure the high e is still ringing rather than muted by your ring finger, and on C and D, check that the low strings you are meant to be skipping are actually staying silent.
The C – G – Am – F loop is the famous one, the progression behind so many hits that a comedy trio built an entire act out of it. F is the odd one out, since it needs a barre. Substitute Dm until the barre is ready — it is not the same chord, but it sits in the same place and sounds good.
👩🏫🎸 Stuck on a change, or not sure whether the buzz is you or the guitar? Get MOOZ and take your first guitar lesson →.
Songs that use only these shapes
No barre, no extensions, nothing above the third fret. Every one of these sits inside the eight chords above.
- Horse With No Name — Em and D, alternating the whole way through. Two chords for an entire song.
- Achy Breaky Heart — E and A. One change, drilled several hundred times.
- Knockin’ on Heaven’s Door — G, D, Am, C.
- Leaving on a Jet Plane — G, C, D.
- Bad Moon Rising — D, A, G.
- Three Little Birds — A, D, E.
- Wagon Wheel — G, D, Em, C. The same four chords as Knockin’ on Heaven’s Door, in a different order.
- Wonderwall, with a capo on the 2nd fret — Em, G, D, A.
If you have not met one yet: a capo is a sprung clamp that bars all six strings at whichever fret you put it on, so the same shapes come out in a higher key. They cost about $10, every guitarist owns one, and it is worth having before you need it.
Two honest notes. Stand By Me appears on every beginner list, and the real progression is A – F#m – D – E, where F#m is a barre chord. The A – D – E version is a simplification: it works, people play it that way, but it is not quite the record. And Wonderwall genuinely needs that capo — without it you are playing in the wrong key for the vocal.
If you want more of these with the strumming patterns attached, easy guitar songs for beginners walks through eighteen of them sorted by how many chords they need.
How to practise the changes
Nobody’s problem is the chords. Everybody’s problem is the two seconds of silence between them. So practise the gap rather than the shapes.
Isolate the change. Play the last beat of one chord and the first beat of the next, nothing else. Back and forth. It feels tedious for about ninety seconds and then it starts working.
Use a metronome at 50 to 60 bpm. Slower than feels dignified. Move up by 4 bpm only after three clean cycles in a row — and clean means every string sounding, landing on the beat, not roughly in the area of it.
Keep your fingers near the fretboard. Watch yourself in a mirror or on your phone camera. Most beginners lift their fingers an inch off the strings between chords, and every millimetre of that is time you cannot get back. Under 5 mm is the target.
Drill pairs, not the whole loop. Em–G, G–C, C–Am, Am–Em, D–G. Each pair on its own until it stops needing thought, then string them together.
Cap it at 12 to 15 minutes. Chord changes are hard on a hand that is not conditioned yet. Do fifteen minutes, then play something fun, then stop.
Record 30 seconds a week. You will not hear your own progress day to day, and you will absolutely hear it across a month. It also catches the muted strings your ears stop noticing.
The mistakes that keep chords from ringing
Pressing far too hard. Almost everyone does this at first. It buzzes the neighbouring strings, exhausts your hand and slows every change down. Press just behind the fret, firmly but lightly, and back off until you find the least pressure that still sounds clean.
Flat fingers. A finger lying flat touches the string next door and silences it. Fingertips vertical, knuckles bent, nails short.
Thumb hooked over the top of the neck. Fine for some blues shapes later on, but for these eight it drags your palm forward and flattens your fingers. Thumb behind the neck, roughly opposite your middle finger.
Watching your fretting hand the whole time. It feels necessary and it delays muscle memory badly. Look once to place the shape, then look away and trust your hand to find it.
Skipping the mute check. After you form a chord, pick each string one at a time before you strum. Any dead or buzzing note tells you exactly which finger is misbehaving. Fix it there, before you play the chord a hundred more times with the fault built in.
When a guitar chord finder actually helps
A guitar chord finder is a tool that takes a chord name and returns diagrams for it, usually in several positions up the neck. Useful, but not yet.
For the first few months these eight open shapes cover almost everything you will want to play, and a finder mostly offers you alternatives you have no use for — jazz voicings, shapes at the 7th fret, four different ways to play a G. Reach for one when a song genuinely needs a chord outside this set, like a full F or a Bm, and set it to show open positions first.
What a finder cannot do is tell you whether the chord you are playing sounds right. That is still your ears, and eventually someone else’s.
FAQ: guitar chords for beginners
What are the easiest guitar chords for absolute beginners?
Em is the easiest by a clear margin — two fingers, all six strings, nothing to avoid. Am and E major come next. Those three are a realistic first week.
How many basic guitar chords do I need before I can play songs?
Two will do it. Em and D get you through Horse With No Name today. Four — G, C, D and Em — unlock dozens of songs, and the eight on this chart cover the overwhelming majority of beginner material.
How long until chord changes become smooth?
With fifteen focused minutes a day, most players get clean changes between the core shapes in four to eight weeks. The range is wide because hand size, guitar setup and how much tension you carry all feed into it, which is also why a teacher watching you for one lesson can save weeks.
Should I print a chord chart or use my phone?
Print it. A phone means unlocking a screen, looking away from your hands and losing the thread. A sheet of paper propped on the music stand stays where you left it.
What is the difference between basic guitar chords and barre chords?
Open chords use open strings and live in the first three frets. Barre chords ask your index finger to hold down several strings at once across a single fret, which lets you slide the same shape anywhere on the neck. They are more useful and much harder. Do them after these eight are automatic.
Are easy music chords the same on every instrument?
The names are. C major is the same three notes on guitar, piano or ukulele — but the shape your hand makes is completely different, because the strings and keys are laid out differently. A chord chart is specific to the instrument it was drawn for.
Can I learn guitar chords without reading music?
Yes, and most guitarists do. Chord diagrams and guitar tab both skip standard notation entirely. Reading music opens other doors later, but it is not the entry fee.
Get live feedback from a guitar teacher
The chart tells you where your fingers go. It cannot tell you that your wrist is locked, that your ring finger is quietly deadening the string beside it, or that you speed up every time a change gets difficult. Those are the things a teacher catches in about ten seconds and you might carry for a year.
If you are learning online, an ordinary video call works against you. Compression flattens an acoustic guitar into something thin and papery, and a single camera shows your teacher either your face or your hands, never both at once. A tool built for music lessons keeps the sound intact and shows both hands together, with a metronome and tuner already in the window.
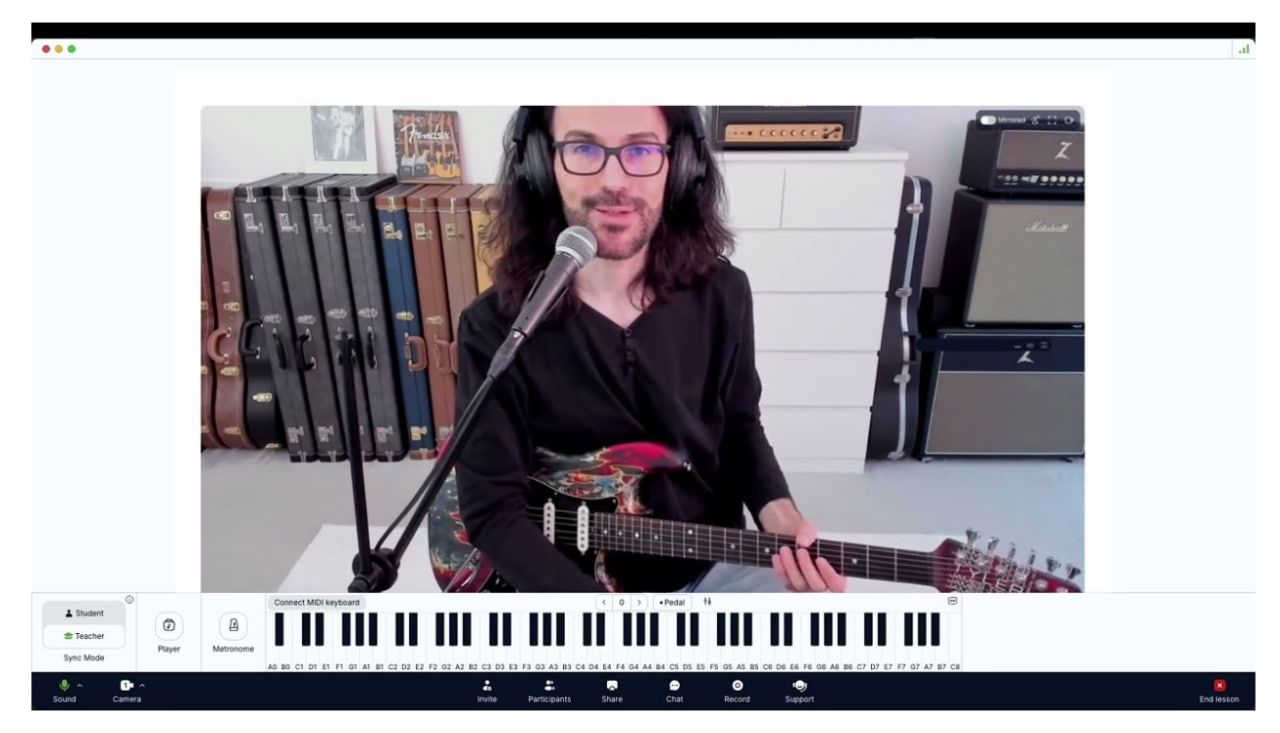
A guitar lesson running in MOOZ. Free for students to join.
Next steps
- Form Em until all six strings ring. Then Am. Switch between them for two minutes without looking at your hand.
- Add G and C. Loop G – D – Em – C at 60 bpm and record thirty seconds of it.
- Get MOOZ and take your first guitar lesson — filter by your own country and language, pick someone whose profile you like, and play them that recording.
Eight shapes, one chart, and the patience to practise the gaps between them. Everything that comes afterwards — barre chords, fingerpicking, playing lead — is built directly on this foundation, and none of it arrives until these are clean.
Related Articles

Before & After: MOOZ Multi-Cam Boosts Online Guitar Classes
Learn how MOOZ Multi-Cam system dramatically elevates online guitar lessons.

The First 30 Days: How to Check Your Online Music Lessons Work
Read MOOZ's step-by-step guide to checking your online music lessons after the first month.
Music Teachers and Time Management: Burnout Cancelled
Drowning in lesson plans and admin? This guide helps music teachers master their schedule.